Sublime安装配置使用教程
Sublime教程
[TOC]
安装
配置
安装package control
这是sublime官方的包管理软件,可以安装、卸载包。
直接安装
sublime Text 版本>3.1,则可:cmd+shift+P,弹出下拉菜单,输入package control,选择Install Package Control
控制台安装
若上法无效,按ctrl+` 调出控制台,参见package control官网,输入如下代码:
import urllib.request,os,hashlib; h = 'df21e130d211cfc94d9b0905775a7c0f' + '1e3d39e33b79698005270310898eea76'; pf = 'Package Control.sublime-package'; ipp = sublime.installed_packages_path(); urllib.request.install_opener( urllib.request.build_opener( urllib.request.ProxyHandler()) ); by = urllib.request.urlopen( 'http://packagecontrol.io/' + pf.replace(' ', '%20')).read(); dh = hashlib.sha256(by).hexdigest(); print('Error validating download (got %s instead of %s), please try manual install' % (dh, h)) if dh != h else open(os.path.join( ipp, pf), 'wb' ).write(by)手动安装
若上法无效,参见package control官网,下载安装包,放到指定的路径
用户设置
点首选项-Package Settings-Package Control-Setting - User ,写
{
    "bootstrapped": true,
    // A list of URLs that each contain a JSON file with a list of repositories.
    // The repositories from these channels are placed in order after the
    // repositories from the "repositories" setting
    "channels":
    [
        "http://static.zybuluo.com/parkinwu/x5xsu1vjaob4hmktfexncfbz/channel_v3.json"
        // 用于重载 default setting中的 "https://packagecontrol.io/channel_v3.json"
        // 避免 "https://packagecontrol.io/channel_v3.json" 失效时,package control无法联网
        // 参见:https://www.bbsmax.com/A/ZOJPKDy2zv/
    ],
}
安装必要的包
cmd+shift+P,弹出下拉菜单,输入package control,选择Package Control: Install Package,弹出下来菜单,输入包的名字(如下),选择之,等待页底“[ = ]”等待提示消失,变成“loaded”,即安装加载完此包
以下为建议安装的包:
ChineseLocalizations:汉化包
ConvertToUTF8:utf-8编码
Monokai Extended:配色方案。在首选项-配色方案-Monokai Extended里面选择相关主题
Theme - SodaReloaded:主题。在用户配置文件里添加"theme": "SoDaReloaded Dark.sublime-theme",
SideBarEnhancements:侧边栏增强
HostsEdit:hosts的语法高亮
SSH Config: ~/.ssh/config的语法高亮和自动补全,输入"host"即产生一个Host的模板
Anaconda:Python代码自动补全、PEP8格式化等
- 配置Anaconda用户设置:
{
    //忽略各种空格不对, 超过80字, import的函数没有使用的提醒
    "pep8_ignore": ["E501", "W292", "E303", "W391", "E225", "E302", "W293", "E402"],
    "pyflakes_explicit_ignore":
    [
        "UnusedImport"
    ],
    //保存文件后自动pep8格式化
    "auto_formatting": true,
    //库函数的提示
    "enable_signatures_tooltip": true,
    "merge_signatures_and_doc":true,
    //禁止代码分析检查
    "anaconda_linting": false,
}SublimeREPL:代码交互式解释器
- SublimeREPL的Python快捷键设定:点击
首选项-快捷键设置(不是首选项-Package Setting-SublimeREPL-Setting User),输入如下代码:
[
    {
        "command": "add_current_time",
        "keys":["ctrl+shift+."]
    },
    {
        //按F5执行Python编译
        "keys":["f5"],
        "caption": "SublimeREPL: Python - RUN current file",
        "command": "run_existing_window_command", "args":
        {
            "id": "repl_python_run",
            "file": "config/Python/Main.sublime-menu"
        }
    },
    {
        //按F6打开Python交互式窗口
        "keys":["f6"],
        "caption": "SublimeREPL: Python",
        "command": "run_existing_window_command", "args":
        {
            "id": "repl_python",
            "file": "config/Python/Main.sublime-menu"
        }
    },
    {
        //按F7执行所选Python代码片段编译
        "keys":["f7"],
        "caption": "SublimeREPL: Python - PDB current file",
        "command": "run_existing_window_command", "args":
        {
            "id": "repl_python_pdb",
            "file": "config/Python/Main.sublime-menu"
        }
    },

    {
        "command": "python_virtualenv_repl",
        "caption": "SublimeREPL: Python - virtualenv"
    },
    {
        "caption": "SublimeREPL: Python - IPython",
        "command": "run_existing_window_command", "args":
        {
            "id": "repl_python_ipython",
            "file": "config/Python/Main.sublime-menu"
        }
    }
]- REPL和Editor各占一个标签,为了方便查看,可点击
视图-布局-行:2即可,拖动分割线可调整窗口大小。
emmet:快速编写HTML和CSS代码
- 说明:emmet语法输入后应该按下tab键方可出现效果
- 参考:HTML/CSS 速写神器:Emmet
OmniMarkupPreviewer:标记语言渲染插件
- 可将标记语言文件渲染为 HTML 并在浏览器上实时预览,同时支持导出 HTML 源码文件
- 配置OmniMarkupPreviewer用户设置:
{
    "mathjax_enabled": true,
    "renderer_options-MarkdownRenderer": {
        "extensions": ["abbr", "attr_list", "def_list", "footnotes", "meta", "toc", "tables", "fenced_code", "codehilite"]
    }
}
配置用户设置
{
    "color_scheme": "Packages/Monokai Extended/Monokai Extended Bright.tmTheme",
    "theme": "SoDaReloaded Dark.sublime-theme",
    // 侧边栏文件夹显示加粗,区别于文件
    "bold_folder_labels": true,
    "default_encoding": "UTF-8",
    "draw_white_space": "all",
    // 保证在文件保存时,在结尾插入一个换行符。
    // 这样 git 提交时不会生产额外的 diff
    "ensure_newline_at_eof_on_save": true,
    "font_size": 13,
    "highlight_line": true,
    //忽略VIM模式
    "ignored_packages":
    [
        "Vintage"
    ],
    // 窗口失焦立即保存文件
    "save_on_focus_lost": true,
    "soda_classic_tabs": true,
    "tab_size": 4,
    "translate_tabs_to_spaces": true,
    // 自动移除行尾多余空格
    "trim_trailing_white_space_on_save": true,
    "trim_automatic_white_space": true,
}设置ctrl+b自动打开Chrome编译HTML
点击工具/编译系统/建编译系统,输入:
{
    "cmd": ["C:\/Program Files (x86)\/Google\/Chrome\/Application\/chrome.exe","$file"]
}然后保存为名为Chrome.sublime-build的文件,放置于SublimeText3\Data\Packages\User\里面。
加alias
~/.bash_aliases中加入
alias sub='open -a "/Applications/Sublime Text.app"' # sub 文件名Mac上快捷键
开关
⌘(⇧)N 创建一个标签页/(新sublime窗口)
⌘(⇧)W 关闭一个标签页/(新sublime窗口)
⌘Q 关闭sublime及其所有窗口
⌘⇧T 恢复刚刚关闭的标签页
⌘KB 开关侧栏
⌃` 开关控制台
⌘⇧P 命令提示,之后可输入“install package”等
分屏
层次关系:sublime窗口 - 分屏 - 标签页(与文件一一对应)
⌘⌥[1-4] 几列分屏
⌘⌥5 网格(二行二列)
⌃[1-4] 光标移动到相应的组(分屏编号)
⌃⇧[1-4] 将当前文件移动到相应的组(分屏编号
⌘[1-4] 选择相应的标签页
前往
⌘P 前往文件、前往项目、命令提示、前往method等等(Goto anything)
⌘⌃P 前往项目
⌘T 前往文件
⌘R 前往method
移动选择
⌃(⇧)- 光标跳回上/下一个位置
⌃G 前往行
⇧←/→ 选择左/右延一字
⇧↑/↓ 选择下/上延一行
⌃/⌥ + (⇧)+←/→ 进行逐词移动/(选择)
⌘ (⇧)←/→ 进行逐词选择/(选择)
⌘(⇧)↑/↓ 选择/(选择)到文件头/尾巴
⌘⌃↑/↓ 光标所在行/选中区域上/下移一行
⌘A文件中全选
行
⌘L 选择行;重复按下将下一行加入选择
⌘⇧L 将选区转换成多个单行选区
括号
⌃M 跳转至对应的括号
⌃⇧M 选择最内一层大中小括号的内容,每按一次外扩一层括号
查找选择
⌘+ 鼠标选中:多选
⌘D 选择光标所在词;重复按,把下一个与所选重复的加入选择
⌘KD 跳过当前目标
⌘U 回退一个目标
Esc 退出多选模式
⌘⌥(⇧)g 跳转到(上)/下一个与所选重复的
⌘⌃g 选中所有与所选重复的
查找替换
⌘F 查找
⌘⌥F 查找并替换
⌘⇧F 在所有打开的文件中进行查找
删除
⌘(⇧)↩ 在光标上/下插入新行
⌘⌫ 清空行
⌃⇧K 删除行(下一行上移)
⌘KK 从光标处删除至行尾
⌘K⌫ 从光标处删除至行首
⌘J 合并行(删除光标、选中区所在行尾的换行符)
复制黏贴
⌘C 复制
⌘X 剪切
⌘V 粘贴
⌘⇧V 粘贴并自动缩进
⌘⌥V 从历史中选择粘贴
⌘⇧D 就地复制选中内容到选区后光标后
撤销
⌘Y = ⌘⇧Z 重做
⌘(⇧)Z 撤销/(重做) – 不含光标移动
⌘(⇧)U 软撤销/(重做) --含光标移动
格式
⌘KU/L 改为大/小写
⌘[/] 向左右/缩进
⌘(⌥)/ (块)注释
保存
⌘(⌥)S 保存当前/(所有)文件
编辑远程文件
法一 rsub
只能编辑文件,不能编辑文件夹
服务器
- 安装rsub
wget -O <安装路径>/bin/rsub \https://raw.github.com/aurora/rmate/master/rmate
chmod +x /usr/local/bin/rsub
本地
-
安装
rsubSublime3 插件Sublime Text 3中,开package control (
⌘⇧P, 输入“Install Package”),搜索rsub安装之 -
链接服务器加"-R 转发"
ssh -R 52698:localhost:52698 server_user@server_address- 本地先打开sublime,然后在服务器上输入
rsub 文件1 [文件2 [..]]本地会用sublime编辑上述文件
若本地sublime未先打开,则本地无进程侦听会52698端口,服务器会报错
Warning: remote port forwarding failed for listen port 52698法二 sftp插件
安装
⌘⇧P,下拉菜单输入“Package Control: Install Package”选之,新下拉菜单输入“sftp”,安装此插件
破解
打开本文件夹下private/sftp svn 插件注册机/svn-sftp-keygen.app,输入邮箱,点击生成验证码,将邮箱与验证码复制出来。
再在下图处,打开sftp的用户设置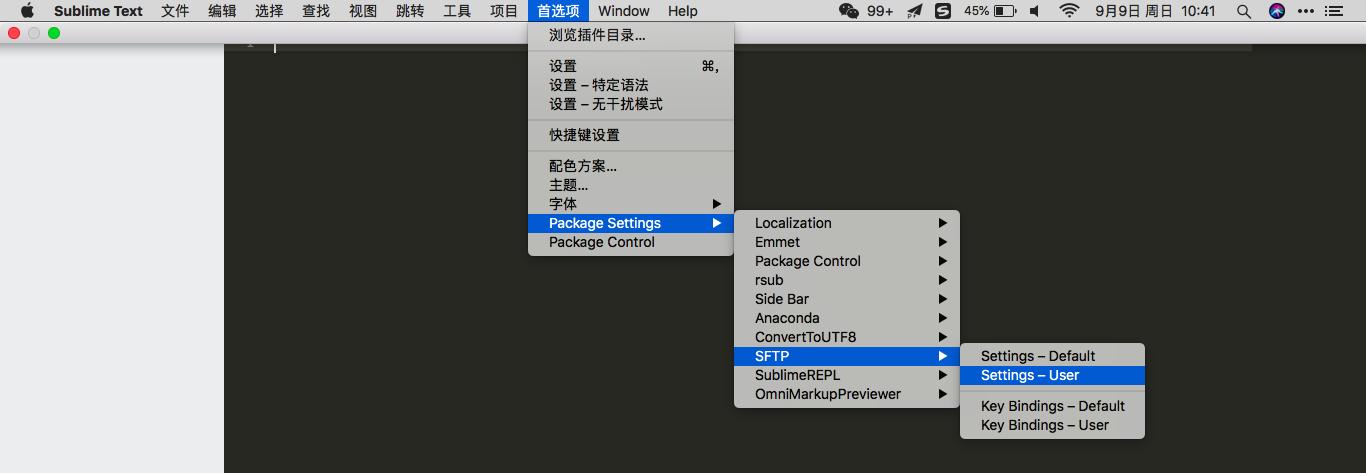
输入上述邮箱与验证码
{
    "email":"邮箱",
    "product_key":"验证码"
}
然后重启sublime ,即不弹出对话框“sftp插件要收费”,则说明注册成功
使用
sftp插件有两种模式
- 远程模式:本地文件夹同步与文件夹用sftp同步,sublime可打开远程文件
- 服务器模式:本地sublime可浏览远程目录,增删改远程文件和文件夹,但只能开文件,不能开文件夹
远程模式
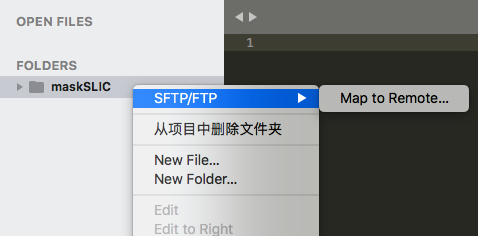
在本地文件夹下,添加sftp-config.json文件,内写本文件夹的sftp配置,即与何服务器上何文件夹如何同步。
配置方法,左栏中,右键本地文件夹,弹出菜单中如下点击
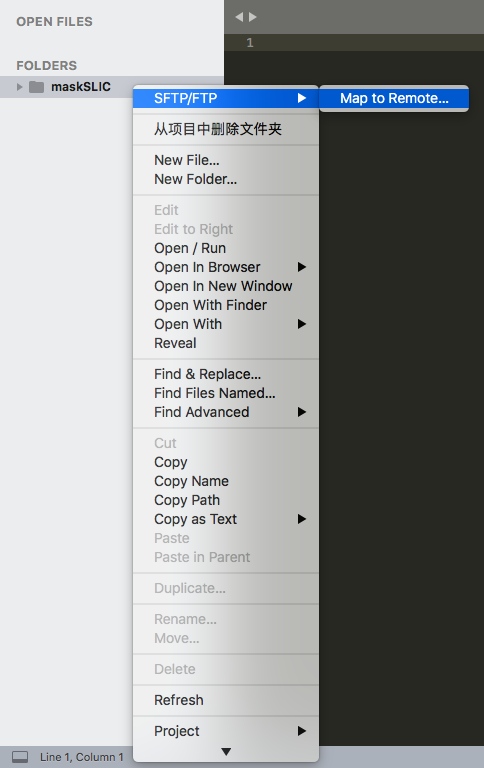
而后,弹出下图配置文件,需自行修改
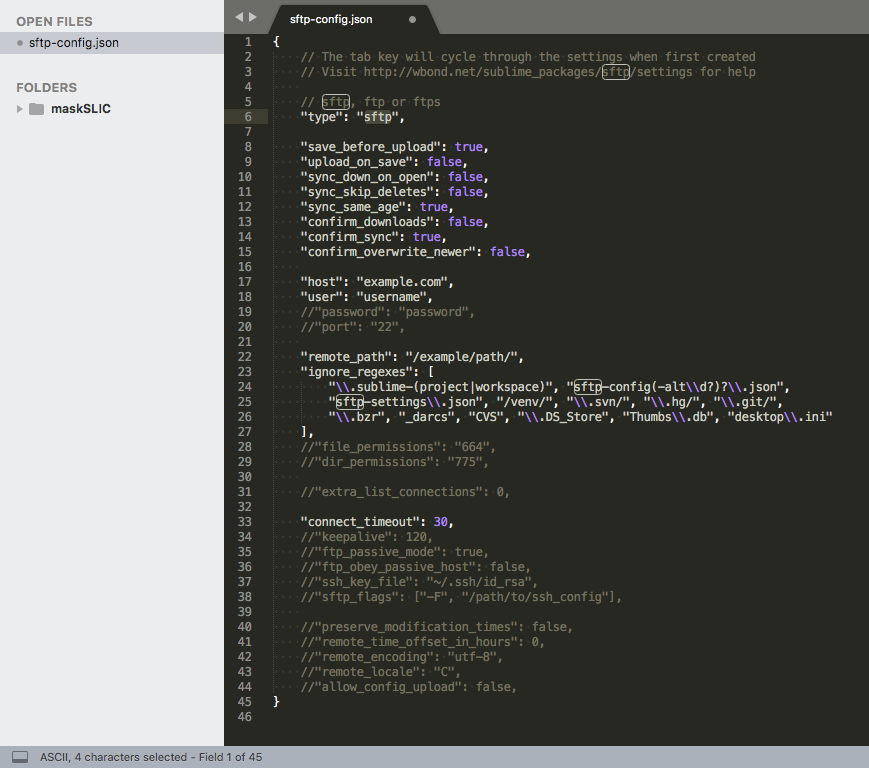
建议修改为如下模板
{
    // The tab key will cycle through the settings when first created
    // Visit http://wbond.net/sublime_packages/sftp/settings for help

    // sftp, ftp or ftps
    "type": "sftp",

    "save_before_upload": true,
    "upload_on_save": true, // 保存即上传
    "sync_down_on_open": false,
    "sync_skip_deletes": false,
    "sync_same_age": true,
    "confirm_downloads": false,
    "confirm_sync": true,
    "confirm_overwrite_newer": false,

    "host": "<服务器网址>",
    "user": "<用户名>",
    "password": "<密码>",
    "port": "<端口>",
    "remote_path": "<远程文件夹路径>",

    "ignore_regexes": [
        "\\.sublime-(project|workspace)", "sftp-config(-alt\\d?)?\\.json",
        "sftp-settings\\.json", "/venv/", "\\.svn/", "\\.hg/", "\\.git/",
        "\\.bzr", "_darcs", "CVS", "\\.DS_Store", "._\\", "Thumbs\\.db", "desktop\\.ini"
    ],
    //"file_permissions": "664",
    //"dir_permissions": "775",

    //"extra_list_connections": 0,

    "connect_timeout": 30,
    //"keepalive": 120,
    //"ftp_passive_mode": true,
    //"ftp_obey_passive_host": false,
    // "ssh_key_file": "~/.ssh/id_rsa",
    // "sftp_flags": ["-F", "~/.ssh/config"],

    //"preserve_modification_times": false,
    //"remote_time_offset_in_hours": 0,
    "remote_encoding": "utf-8",
    //"remote_locale": "C",
    //"allow_config_upload": false,
}
而后保存此sftp配置文件,到上述本地文件夹。sftp配置文件必需名为``sftp-config.json`,不然插件不会加载之。
之后的sftp操作有
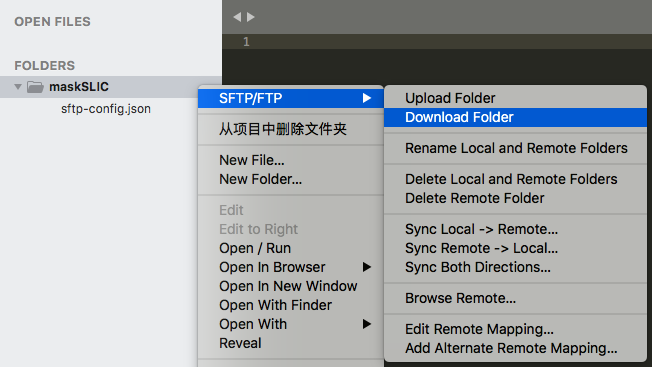
| 操作 | 传送内容 | 不上传的内容 | 原理 |
|---|---|---|---|
| Upload、Download | 全文件夹 | 无 | 凡此有之文件即传至彼(不论彼有无之,不论谁新谁旧),但不删除此无彼有的文件(夹) |
保存文件(若"upload_on_save": true) |
被保存的文件(就、新文件) | 文件增(除非打开改文件再按保存)、删、改名 | 之上传被保存的文件 |
| Sync Local -> Remote | 文件(夹)增、删、编、改名,可非sublime里做的 | 无 | 比较两边的文件树及文件编辑时间,令远端的与本地的树一致,故远有本无之文件(夹)则远删之,本有远无、本新远旧者则上传之 |
| Sync Remote -> Local | 恰与上反向 | 无不下传 | 恰与上反向 |
| Sync Both Directions | 文件增、 |
文件(夹)删除、改名、移动 | 比较两边的文件树及文件编辑时间,只传不删,此有彼无、此新彼旧者则传此端该文件(夹)至彼 |
建议用法:
- 为避免下载数据,代码文件夹下不存数据、结果、模型分离,只存其文件夹的链接,指向数据、结果、模型的文件夹
- 新建本地空同步文件夹,或在终端ssh 删、改名、移动文件(夹)、编辑后 (尽量避免),要立即**Sync Remote -> Local **
- 新建远程空同步文件夹,或在本地 删、改名、移动文件(夹)、编辑后,要立即Sync Local -> Remote
- 每次按保存自动上传保存的文件
注意:
- Sync Remote -> Local ** 和Sync Local -> Remote ** 的快捷键
⌘⌃U+S/D,并不能删除此有彼无的文件,是个bug,不建议用;从左栏右键单击项目文件,点SFTP/FTP-Sync Remote -> Local、Sync Local -> Remote才可以做到。
服务器模式
配置:
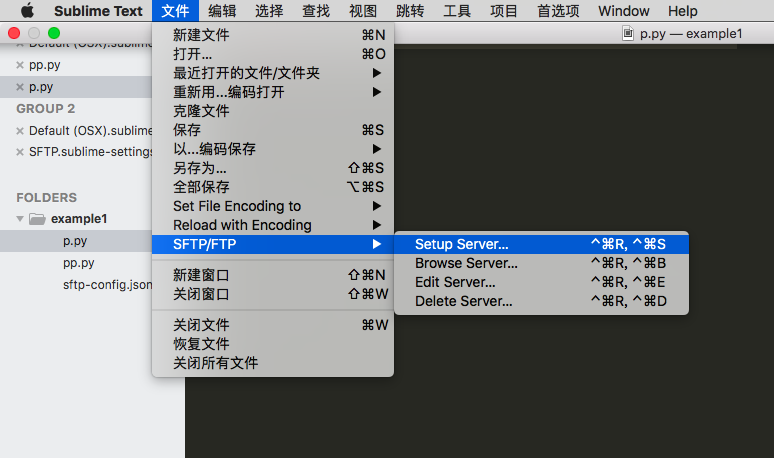
- 弹出
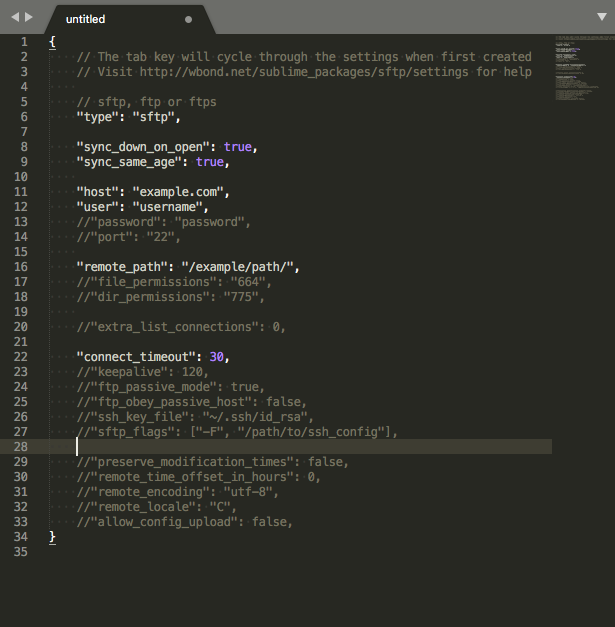
- 写入
{
    // The tab key will cycle through the settings when first created
    // Visit http://wbond.net/sublime_packages/sftp/settings for help

    // sftp, ftp or ftps
    "type": "sftp",

    "sync_down_on_open": true,
    "sync_same_age": true,

    "host": "<网址>",
    "user": "<用户名>",
    "password": "<密码>",
    "port": "<端口>",

    "remote_path": "<路径>",
    //"file_permissions": "664",
    //"dir_permissions": "775",

    //"extra_list_connections": 0,

    "connect_timeout": 30,
    //"keepalive": 120,
    //"ftp_passive_mode": true,
    //"ftp_obey_passive_host": false,
    //"ssh_key_file": "~/.ssh/id_rsa",
    //"sftp_flags": ["-F", "/path/to/ssh_config"],

    //"preserve_modification_times": false,
    //"remote_time_offset_in_hours": 0,
    //"remote_encoding": "utf-8",
    //"remote_locale": "C",
    //"allow_config_upload": false,
}
- 保存到
/Users/<用户名>/Library/Application Support/Sublime Text 3/Packages/User/sftp_servers/<任意文件名表示一个服务器,或一个远程项目>
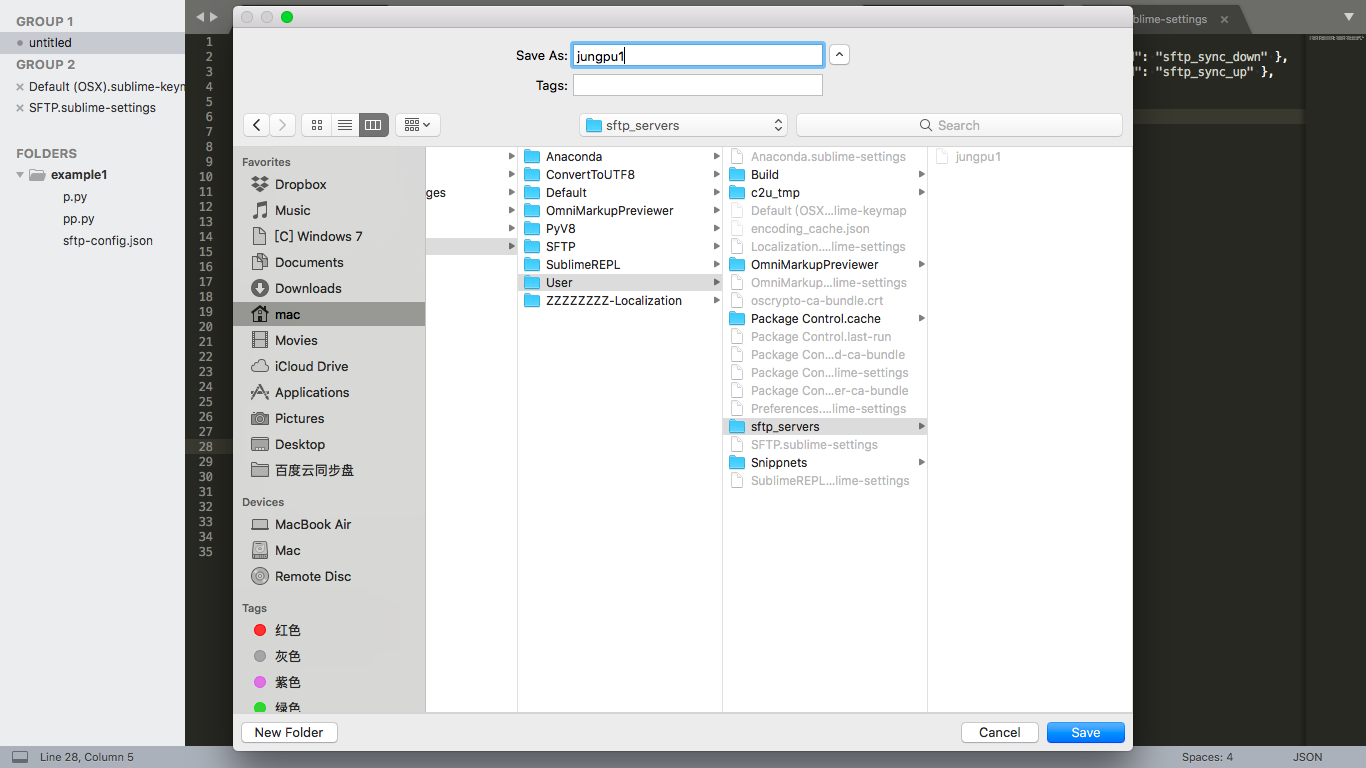
使用:
- 弹出下拉菜单,选一个远程
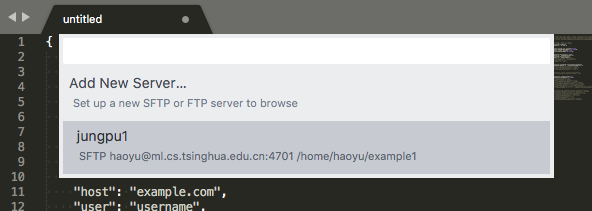
- 然后可以进出文件夹,并增删编改名文件(夹),但无法用sublime打开一整个文件夹
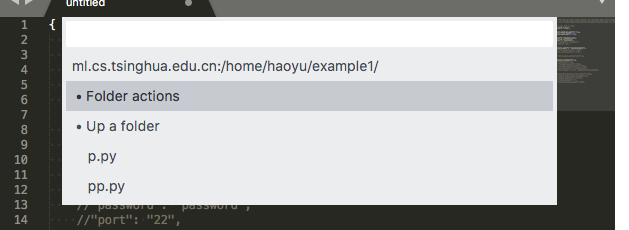
在iterm2下远程开sublime sftp
为了在ssh后,可以 sub [文件或文件夹 [文件或文件夹 [...]]]打开本地的sublime
流程
st=>start: 远程输入命令`sub`
cond=>condition: 单个文件?
file=>operation: 在iterm2中输出“open sublime on mac client”,开启服务器端的rsub
dirs=>operation: 在iterm2中输出“用户名 服务器别名 文件夹绝对路径”
op1.1=>operation: iterm的trigger检测之,开本地sublime
op1.2=>operation: 由rsub开文件
op2.1=>operation: iterm的trigger检测之
op2.2=>operation: 本地脚本解析~/.ssh/config,得到服*务器别名*对应的登录信息
op2.3=>operation: 本地脚本生成本地的同步文件夹,自动填写其下sftp-config.json,并打开项目文件夹
end=>end: 跳转到sublime界面
st->cond
cond(yes)->file->op1.1->op1.2->end
cond(no)->dirs->op2.1->op2.2->op2.3->end
远程脚本
写在~/.bash_aliases_share
# sublime的别名
sub(){
    if [ -d /Applications/Sublime\ Text.app ]; then
    # 本地是Mac,且有sublime
        open -a "/Applications/Sublime Text.app" $*
    else
    # 由iterm2打开本地(mac)上的sublime
        echo open sublime on mac client
        sleep 0.1
    # 本地非mac,或无sublime
        dirs=""
        for arg in $@; do
            if [ -f $arg ]; then
                # echo "用笔记本上的sublime开文件 $arg"
                rsub $arg
            elif [ -d $arg ]; then
                # echo "用笔记本上的sublime开文件夹: $arg"
                dirs="$dirs $(cd $arg; pwd)"
            else
                echo no directory or file $arg
            fi
        done
        if [ "$dirs" != "" ]; then
        # 以备iterm2抓取用户、服务器、文件夹路径,从而用远程的sublime sftp开
            echo "user: $USER; hostname: `hostname`; path: '$dirs'"
        fi
    fi
}
iterm2触发器
在iterm2的preference中,
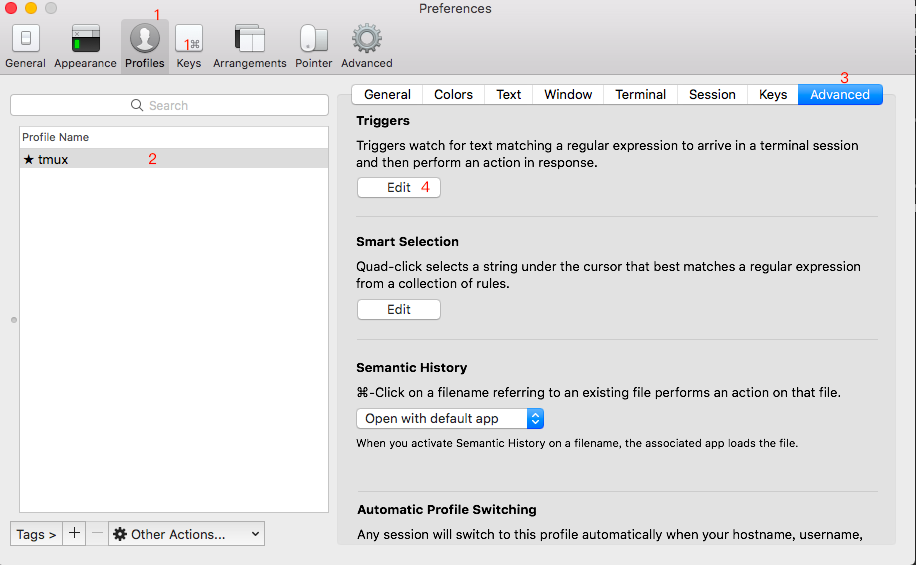
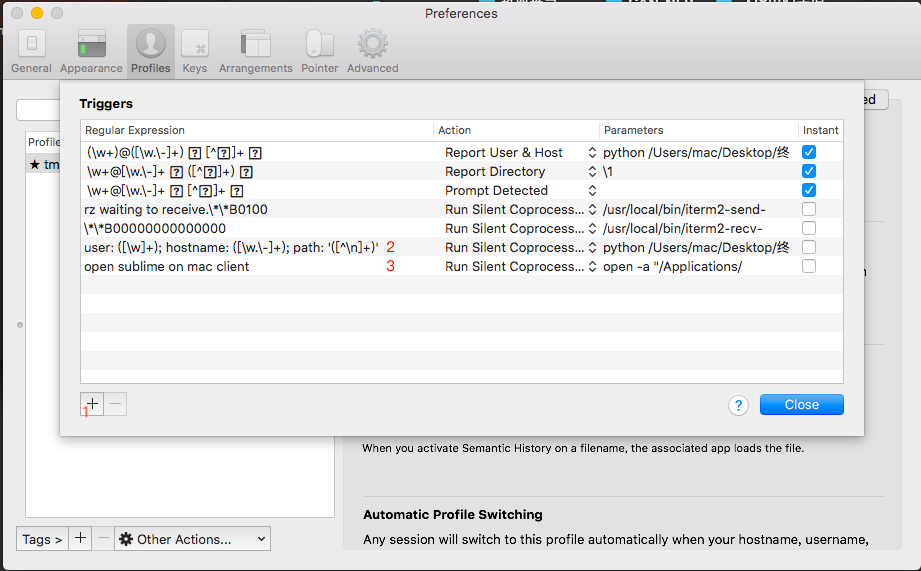
| Regular Expression | Action | Parameters |
|---|---|---|
user: ([\w]+); hostname: ([\w.\-]+); path: '([^\n]+)' |
Run Silent Coprocess | python /Users/mac/macENV/sublime_open_remote_dir.py \1 \2 '\3' |
open sublime on mac client |
Run Silent Coprocess | open -a "/Applications/Sublime Text.app" |
本地脚本
然后写sublime_open_remote_dir.py,用于在/Users/mac/Desktop/remote_code/ 生成项目文件夹,在其下添加配置sftp-config.json,配置中的服务器信息,从~/.ssh/config解析得到。
import sys
from parse_sshconfig import load_sshconfig
import os


local_root_path = "/Users/mac/Desktop/remote_code"
ssh_config = "/Users/mac/.ssh/config"
SshConfig = load_sshconfig(ssh_config)


user, host_alias, remote_paths = sys.argv[1:4]
if not host_alias in SshConfig.keys():
    print(host_alias, "is not a `Host` in", ssh_config)
    sys.exit(0)
host = SshConfig[host_alias]

remote_paths = [e for e in remote_paths.split(' ') if e != '']
for remote_path in remote_paths:
    dir_name = remote_path.split('/')[-1]

    host_info = ('\n    "host": "%s",' % host["hostname"]) + \
        ('\n    "user": "%s",' % host["user"]) + \
        ('\n    "password": "%s",' % host["password"]) + \
        ('\n    "port": "%s",' % host["port"]) + \
        ('\n    "remote_path": "%s",' % (remote_path))

    sftp_config = r'''{
    // The tab key will cycle through the settings when first created
    // Visit http://wbond.net/sublime_packages/sftp/settings for help

    // sftp, ftp or ftps
    "type": "sftp",

    "save_before_upload": true,
    "upload_on_save": true,
    "sync_down_on_open": false,
    "sync_skip_deletes": false,
    "sync_same_age": true,
    "confirm_downloads": false,
    "confirm_sync": true,
    "confirm_overwrite_newer": false,

    "ignore_regexes": [
        "\\.sublime-(project|workspace)", "sftp-config(-alt\\d?)?\\.json",
        "sftp-settings\\.json", "/venv/", "\\.svn/", "\\.hg/", "\\.git/",
        "\\.bzr", "_darcs", "CVS", "\\.DS_Store", "._\\", "Thumbs\\.db", "desktop\\.ini"
    ],
    //"file_permissions": "664",
    //"dir_permissions": "775",

    //"extra_list_connections": 0,

    "connect_timeout": 30,
    //"keepalive": 120,
    //"ftp_passive_mode": true,
    //"ftp_obey_passive_host": false,
    // "ssh_key_file": "~/.ssh/id_rsa",
    // "sftp_flags": ["-F", "~/.ssh/config"],

    //"preserve_modification_times": false,
    //"remote_time_offset_in_hours": 0,
    "remote_encoding": "utf-8",
    //"remote_locale": "C",
    //"allow_config_upload": false,
''' + \
        host_info + \
        '''
}'''

    local_path = local_root_path + "/" + dir_name
    os.system('mkdir -p ' + local_path)

    sftp_config_path = local_path + '/sftp-config.json'
    with open(sftp_config_path, 'w') as f:
        f.write(sftp_config)

    os.system('open -a "/Applications/Sublime Text.app" ' + local_path)
parse_sshconfig.py,用于解析~/.ssh/config,可根据别名获得服务器网址、端口、用户名、密码
# encoding: UTF-8
import re

# 将正则表达式编译成Pattern对象

def getkey(string, key):
    # pattern = re.compile()
    match = re.search(key + r' [\w\.\:\- ]+', string)
    if match:
        substr = match.group()
        remove_head = re.sub(key + r"[ ]+", "", substr)
        return remove_head
    else:
        return ""


def load_sshconfig(ssh_config):
    HostConfig = {}

    with open(ssh_config, 'r') as f:
        config = f.read()
        hosts = ["Host " + host for host in config.split("Host ")]

        for host_config in hosts:
            hostaliases = getkey(host_config, "Host").split(" ")
            if hostaliases == ['']:
                continue

            hostname = getkey(host_config, "HostName")
            port = getkey(host_config, "Port")
            if port == "":
                port = "22"
            user = getkey(host_config, "User")
            password = getkey(host_config, r"#[ ]*Password")

            for alias in hostaliases:
                HostConfig[alias] = {
                    "hostname": hostname,
                    "port": port,
                    "user": user,
                    "password": password}

    return HostConfig