zsh安装配置教程
环境:ubuntu 16 实验室服务器
时间:2018年8月6日
[TOC]
介绍
zsh :是一款强大的虚拟终端,用以他替代shell, 其配置较为复杂
oh my zsh :zsh的一套强大配置
antigen :zsh的包(即插件)管理器,让我们以类似apt-get的方式来安装zsh的包。其官方会提供已经配置好的oh my zsh和一些常用zsh包。
zsh安装
安装zsh
- 实验室各台服务器上已安装zsh,如未安装,可叫管理员
sudo apt-get -y install zsh-
mac上
-
mac系统自带的zsh
在
/bin/zsh,但版本老了,建议另外安装新版本zsh --version,返回zsh 5.3 (x86_64-apple-darwin18.0) -
另外安装新版本的zsh
不覆盖系统自带的
brew install zsh安装到
/usr/local/Cellar/zsh/版本号并会自动创建链接
/usr/local/bin/zsh -> ../Cellar/zsh/5.7.1/bin/zsh*安装后,
zsh --version,返回/usr/local/bin/zsh
-
更换默认shell为zsh
chsh
修改为默认shell,即用zsh于替代shell,每次登陆或开新的终端都开zsh而不是shell
-
只改个人的
chsh -s `which zsh` # 然后输入个人的密码 -
改整个系统的
sudo chsh -s `which zsh`
# 然后输入root密码
重登服务器则生效。
chsh失效
chsh -s $(which zsh) 操作在以下任意一种情况下无法生效:
-
在WSL(windows的linux子系统)中,使用cmder打开shell。
-
当前用户是非root用户,且当前用户没有密码(这是因为,管理员没给当前用户启用密码,即使当前用户执行
passwd也无法改密成功,因为执行passwd要求输入当前密码,但当前又没密码)which zsh # 返回为 /bin/zsh 或 /usr/bin/zsh chsh -s `which zsh` # 报错如下: > chsh: PAM: Authentication failure passwd # 修改密码 > Changing password for xxx(当前用户). > Current password: # 输入当前密码 > passwd: Authentication token manipulation error > passwd: password unchanged -
当前用户是非root用户,且系统没安装zsh(即没有
/bin/zsh或/usr/bin/zsh)。此时,用户自己用conda安装的zsh,无法用chsh -s注册成默认shell:which zsh # 返回为空 conda install conda-forge::zsh # 用户在自己的conda下安装的zsh,能安装成功 chsh -s $CONDA_PREFIX/bin/zsh # 报错如下。这是因为chsh -s只能使用/etc/shells文件中声明的shell,但当前用户没有root权限,无法将conda下的zsh写入/etc/shells。 > chsh: /home/xxx/anaconda/bin/zsh is an invalid shell
其他更改默认shell的方法
如上述方法不生效,则可采用以下方法解决:
bash转接zsh
优点:以下修改对所有shell入口(包括ssh登录、tmux/vscode开新窗口)有效
缺点:
-
会造成输入
bash命令仍会打开zsh -
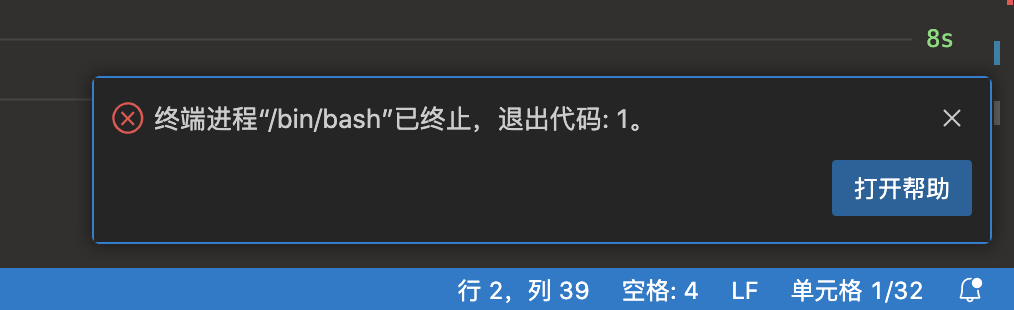
vscode 终端输入 exit,执行后,vscode右下角弹窗报错:“终端进程“/bin/bash”已终止,退出代码:1。"
解决办法见配置shell的入口 ,vscode中的服务器配置。
![image-20250324180117943]()
在~/.profile 第一行中加入如下配置,每次交互式+登录式开启bash时,如ssh登录,都转到登录式zsh。
export PATH=/data/nas/gaobo/environment/miniconda/bin:$PATH # 如果`which zsh`返回为空,则执行conda install conda-forge::zsh ,并设置此行
[[ $- = *i* ]]      && [ -z "$ZSH_VERSION" ] && [ -x `which zsh` ] && export SHELL=`which zsh` && exec zsh -l
# 若当前是交互式shell 且 当前shell不是zsh 且 当前有zsh 则 变更SHELL为zsh 并 切换到登录式zsh在~/.bashrc 第一行中加入如下配置,每次交互式+登录式开启bash时,如tmux/vscode开新窗口,都转到登录式zsh。
export PATH=/data/nas/gaobo/environment/miniconda/bin:$PATH # 如果`which zsh`返回为空,则执行conda install conda-forge::zsh ,并设置此行
[[ $- = *i* ]]          && [ -z "$ZSH_VERSION" ] && [ -x `which zsh` ] && export SHELL=`which zsh` && exec zsh
# 若当前是交互式终端shell  且 当前shell不是zsh      且   当前有zsh         则 变更SHELL为zsh         并 切换到非登录式zsh
解释:
exec含义:开zsh替代当前shell,即原shell进程结束,完全切换到 Zsh。若在zsh中执行exit,则当前窗口会关闭,而不会回到原shell。exec zsh -l: 登录式开启zsh,会执行~/.zprofile命令exec zsh: 非登录式开启zsh,不会执行~/.zprofile命令
配置shell的入口
分别配置shell的各种入口,使其默认使用shell。这样,输入bash命令会打开bash而非bash。
-
本地的ssh配置:
Host <服务器alias> # 登录使用zsh RequestTTY force RemoteCommand /home/xxx/anaconda/bin/zsh -l # 写"$CONDA_PREFIX"无法生效,必须明写具体的路径 -
vscode中的服务器配置:
{ "terminal.integrated.defaultProfile.linux": "zsh", "terminal.integrated.profiles.linux": { "zsh": { "path": "/home/xxx/anaconda/bin/zsh", // 写"$CONDA_PREFIX"无法生效,必须明写具体的路径 "args": [] } } } -
tmux配置:
# 若conda装了zsh,则使用它作为默认的SHELL,作为交互SHELL 和 执行可执行文件的SHELL
if-shell "[ -f $CONDA_PREFIX/bin/zsh ]" "set -g default-shell $CONDA_PREFIX/bin/zsh; set -g default-command  $CONDA_PREFIX/bin/zsh"
# 写"$CONDA_PREFIX"有效,前提是tmux的父shell(即ssh登录上去的shell)已激活conda环境,CONDA_PREFIX有定义
直接安装oh-my-zsh (root下推荐)
适用于mac和linux
sh -c "$(curl -fsSL https://raw.github.com/ohmyzsh/ohmyzsh/master/tools/install.sh)"报错
Insecure completion-dependent directories detected
若给root安装oh-my-zsh, 运行 sudo su 报错
[oh-my-zsh] Insecure completion-dependent directories detected:
drwxrwxrwx 7 hans admin 238 2 9 10:13 /usr/local/share/zsh
drwxrwxrwx 6 hans admin 204 10 1 2017 /usr/local/share/zsh/site-functions

[oh-my-zsh] For safety, we will not load completions from these directories until
[oh-my-zsh] you fix their permissions and ownership and restart zsh.
[oh-my-zsh] See the above list for directories with group or other writability.

[oh-my-zsh] To fix your permissions you can do so by disabling
[oh-my-zsh] the write permission of "group" and "others" and making sure that the
[oh-my-zsh] owner of these directories is either root or your current user.
[oh-my-zsh] The following command may help:
[oh-my-zsh] compaudit | xargs chmod g-w,o-w

[oh-my-zsh] If the above didn't help or you want to skip the verification of
[oh-my-zsh] insecure directories you can set the variable ZSH_DISABLE_COMPFIX to
[oh-my-zsh] "true" before oh-my-zsh is sourced in your zshrc file.
则依次尝试如下方法, 然后分别运行 sudo su, 直到 sudo su 不再如上报错
- 执行
sudo chmod 755 /usr/local/share/zsh
sudo chmod 755 /usr/local/share/zsh/site-functions- 执行
sudo compaudit | xargs chmod g-w,o-w- 向root的
.zshrc加入
ZSH_DISABLE_COMPFIX="true"安装和使用antigen (普通用户推荐)
安装antigen
导入配置
从网上导入zsh的配置文件到~/.zshrc
curl -L https://raw.githubusercontent.com/skywind3000/vim/master/etc/zshrc.zsh > ~/.zshrc
#   % Total    % Received % Xferd  Average Speed   Time    Time     Time  Current
#                                  Dload  Upload   Total   Spent    Left  Speed
# 100 5388 100 5388 0 0 8482 0 --:--:-- --:--:-- --:--:-- 8607然后输入zsh命令,即开始自动安装插件
zsh
# Installing antigen ...
#   % Total    % Received % Xferd  Average Speed   Time    Time     Time  Current
#                                  Dload  Upload   Total   Spent    Left  Speed
#   0     0    0     0    0     0      0      0 --:--:-- --:--:-- --:--:--     0
#   0     0    0     0    0     0      0      0 --:--:--  0:00:02 --:--:--     0
# 100 58503  100 58503    0     0  17045      0  0:00:03  0:00:03 --:--:-- 17045
# move /tmp/antigen.zsh to /Users/$USER/.local/bin/antigen.zsh
# Installing robbyrussell/oh-my-zsh!...
# Installing rupa/z!...
# Installing zsh-users/zsh-autosuggestions!...
# Installing zsh-users/zsh-completions!...
# Installing Vifon/deer!...
# Installing willghatch/zsh-cdr!...
# Installing zsh-users/zsh-syntax-highlighting!...此~/.zshrc功效:
-
antigen未装则装之:创建
~/.antigen,~/.local,导入antigen配置curl -L git.io/antigen > .local/bin/antigen.zsh -
用antigen加载zsh包,你可根据需要修改
~/.zshrcantigen bundle 包的名称 # 注释掉则不加载此包该命令用于下载和安装插件,如果插件已安装,那么就加载该插件
-
如果出现警告:zsh compinit: insecure directories, run compaudit for list.
chmod -R 755 ~/.antigen
点文件
sh/bash/zsh的点文件执行顺序:
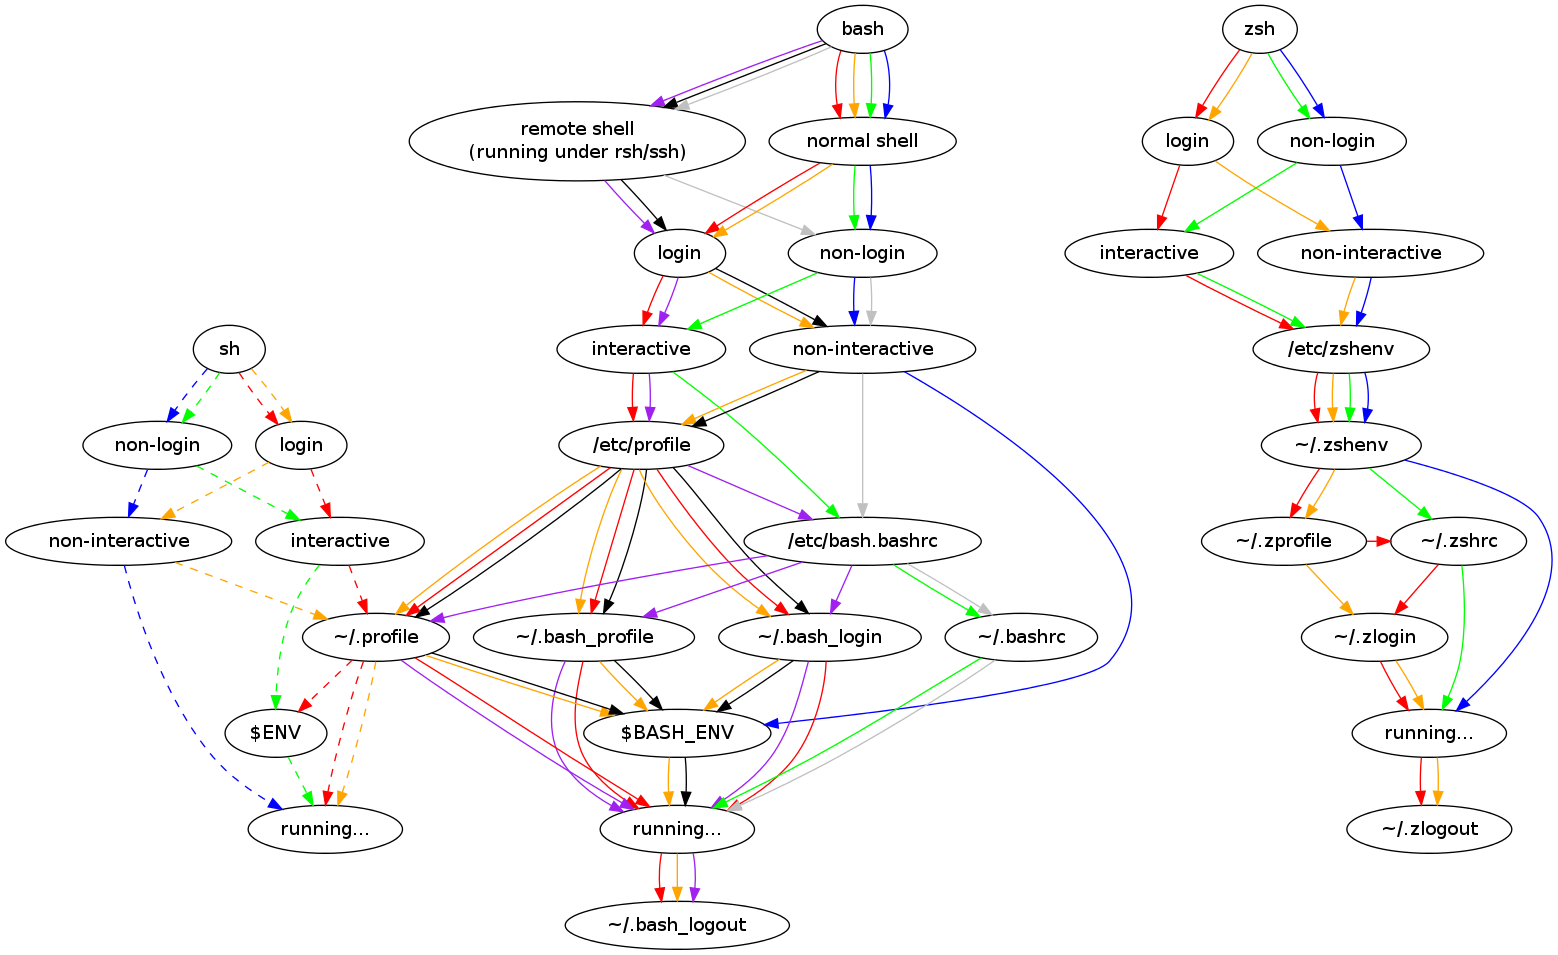
注:bash中的登陆(红、橙、黑、紫线), ~/[.bash_profile|.bash_login|.profile]从前到后找,只执行一个文件。
zsh的点文件
| 自上而下执行 | 触发条件 | { ssh登录^ 1、tmux开新窗口^ 2 } | zsh开一个新的zsh窗口 |
zsh 文件或zsh -c “命令” |
ssh 服务器 命令^ 1 |
ssh登出^ 1 | 作用 |
|---|---|---|---|---|---|---|---|
| ~/.zshenv | 启动zsh总执行 | ✓(执行) | ✓ | ✓ | ✓ | ✗ | 环境变量、alias |
| ~/.zprofile | 登录 | ✓ | ✗ | ✗ | ✗ | ✗ | 登录设置,如文件同步 |
| ~/.zshrc | 启动zsh交互 | ✓ | ✓ | ✗ | ✗ | ✗ | 交互界面、zsh插件(都是交互用的) |
| ~/.zlogin | 登录 | ✓ | ✗ | ✗ | ✗ | ✗ | 登录设置;与.zprofile仅执行先后不同,会都执行 |
| ~/.zlogout | 登出 | ✗(不执行) | ✗ | ✗ | ✗ | ✓ | 登出打扫 |
-
自动触发:上述点文件皆直接被“触发条件”触发,不用在一文件内要写
. 另一个点文件,该机制与bash不同 -
不执行bash的点文件:zsh为系统的默认shell、zsh为tmux的默认shell时,每次登陆或开新tmux窗口时皆然
修改点文件
之前的触发关系是
                                           开新shell
                                               ↓
登录 -> ~/.profile (系统环境配置)-> ~/.bashrc (shell环境配置) -> ~/.bash_aliases (设置别名命令)若chsh -s `which zsh` 修改成功
每次登录都直接进入zsh,则需改为如下触发(source)关系(用箭头表示)
~/.zshenv         ~/.zprofile         ~/.zshrc          ~/.zlogout
     ↓                                  ↓                    ↓
~/.profile  ---------------→     ~/.bash_aliases       ~/.bash_logout
做法如下:
~/.profile中的. ~/bashrc改为. ~/bash_aliases~/.bashrc不动,闲置不用了,被~/.zshrc代替- 修改
~/.zshrc
# .zshenv只写
[ -f ~/.profile ] && . ~/.profile

# 加在.zshrc开头,之后每次编辑~/.zshrc,请确保它在最开头
[ -f ~/.profile ] && . ~/.profile
# 加在.zshrc结尾,之后每次编辑~/.zshrc,请确保它在最结尾,不然zshrc中其他配置会覆盖其alias
[ -f ~/.bash_aliases ] && . ~/.bash_aliases

# ~/.zprofile 写登录同步文件的命令

# ~/.zlogout只写
[ -f ~/.bash_logout ] && . ~/.bash_logout若chsh -s `which zsh` 修改不成功
解决方法详见:其他更改默认shell的方法
下面是简单说明解决方法。
登录不自动进入zsh,则每次登录启动的是bash,运行的是~/.profile
需修改为如下触发关系
                           开新zsh
                             ↓
登录 ->  ~/.profile  ->   ~/.zshrc (zsh包,环境配置)
                             \------> ~/.profile_for_zsh, ~/.bash_aliases
cp ~/.profile ~/.profile_for_zsh- 删除
~/.profile_for_zsh中的. ~/.bashrc和. ~/.bash_aliases - 将
~/.profile清空,只写入
if [[ $- = *i* ]]; then
# 判断是否是交互shell
# whether file descriptor 1 (the shell's standard output) is connected to a terminal
    exec zsh
fi- 修改
~/.zshrc
# 加在.zshrc开头,之后每次编辑~/.zshrc,请确保它在最开头
[ -f ~/.profile_for_zsh ] && . ~/.profile_for_zsh # 个人环境变量设置

# 加在.zshrc结尾,之后每次编辑~/.zshrc,请确保它在最结尾
[ -f ~/.bash_aliases ] &&. ~/.bash_aliases # 个人别名、小脚本设置
MAC上.zshenv设的$PATH前被加别的路径
问题描述
在mac上,zsh登录式启动,在.zshenv中设置的PATH,前方覆盖了别的路径,例如:
-
在
~/.zshenv中设置了export PATH=/Users/$USER/anaconda/bin:/Users/$USER/shareENV/local/bin -
但是zsh登录式启动后,
echo $PATH,返回的头几行是/usr/local/bin /usr/bin /bin /usr/sbin /sbin /Users/$USER/anaconda/bin /Users/$USER/shareENV/local/bin ...
原因分析
-
zsh登录式启动,执行顺序点文件顺序是
... →`~/.zshenv` → `/etc/zprofile` → `~/.zprofile` → ... -
在bash登录式启动,执行顺序点文件顺序是
... → /etc/profile → ~/.profile ↓ 手动执行 ↓ 手动执行 /etc/bashrc ~/.bashrc -
在Mac上,
/etc/zprofile和/etc/profile都有以下内容(在linux上,/etc/zprofile为空)
# system-wide environment settings for zsh(1)
if [ -x /usr/libexec/path_helper ]; then
    eval `/usr/libexec/path_helper -s`
fi-
/usr/libexec/path_helper是Mac上专有的可执行文件,用于将别处设置的系统级的$PATH,添加到当前PATH的开头所添加的内容为
--------------------------------------------- /etc/paths文件中的路径 /usr/local/bin /usr/bin /bin /usr/sbin /sbin --------------------------------------------- 其他地方设置的系统$PATH /Library/TeX/texbin /usr/local/aria2/bin /opt/X11/bin -
故zsh登录启动时,先执行
~/.zshenv中的修改PATH,而后被path_helper在前面加上了系统级的$PATH -
而bash登录启动无此问题,因为是先执行path_helper,再执行
~/.profile中的修改PATH
解决办法
-
法一:若有root权限,建议用本法,所有用户可解决此问题, 对登录和非登录式的zsh均有效
修改
/etc/zprofile,把$PATH复制一份到$PATH_SAVE,执行path_helper修改$$PATH,然后再把$PATH_SAVE粘到$PATH前面将
/etc/zprofile中的# system-wide environment settings for zsh(1) if [ -x /usr/libexec/path_helper ]; then eval `/usr/libexec/path_helper -s` fi改为
# save the $PATH set in ~/.zshenv, to prevent `path_helper` appand the # paths in /etc/zprofile on the begining of $PATH export PATH_SAVE=$PATH # system-wide environment settings for zsh(1) if [ -x /usr/libexec/path_helper ]; then eval `/usr/libexec/path_helper -s` fi # this block means # eport PATH=$PATH_SAVE:$PATH # and then remove repeated paths in PATH # and then unset PATH_SAVE if [ -n "$PATH_SAVE" ]; then PATH_SAVE=:$PATH_SAVE:; PATH=$PATH: while [ -n "$PATH" ]; do x=${PATH%%:*} # the first remaining entry case $PATH_SAVE in *:$x:*) ;; # already there *) PATH_SAVE=$PATH_SAVE$x: ;; # not there yet esac PATH=${PATH#*:} done PATH=${PATH_SAVE:1:-1} unset PATH_SAVE x export PATH fi -
法二:若无root权限, 可用本法, 但对非登录式的zsh无效
在
~/.zshenv结尾写export PATH_SAVE=$PATH在
~/.zprofile开头写# this block means # eport PATH=$PATH_SAVE:$PATH # and then remove repeated paths in PATH # and then unset PATH_SAVE if [ -n "$PATH_SAVE" ]; then PATH_SAVE=:$PATH_SAVE:; PATH=$PATH: while [ -n "$PATH" ]; do x=${PATH%%:*} # the first remaining entry case $PATH_SAVE in *:$x:*) ;; # already there *) PATH_SAVE=$PATH_SAVE$x: ;; # not there yet esac PATH=${PATH#*:} done PATH=${PATH_SAVE:1:-1} unset PATH_SAVE x export PATH fi
换zsh的主题
# 搜索"antigen use oh-my-zsh",其下一行加
antigen theme agnoster # 换主题 # ys , agnoster # 参考:https://github.com/robbyrussell/oh-my-zsh/wiki/themes
中文
若出现中文乱码,说明未设置zsh默认编码为utf8
# 在~/.zshenv中
export LC_ALL=en_US.UTF-8
export LANG=en_US.UTF-8
命令行下配色
Mac需要另外设置命令行下的配色,vim ~/.zshrc, 加在source ~/.bash_aliases之前
# 命令行下的配色

# -------------------- alias to ls -----------------
# 显(xxx)隐(.xxx) 文件(xxx)文件夹(xxx/) 用户名 大小 创建日期 大小用GMk格式
alias ll='ls -alFGh'
# 显(xxx)隐(.xxx) 文件与文件夹不区分(xxx)
alias la='ls -AG'
# 显 文件(xxx)文件夹(xxx/)
alias l='ls -CFG'
# 上色 文件(白)文件夹(紫)
alias ls='ls -G'

# -------------------- alias to grep ------------------
# 上色
alias grep='grep --color'
alias egrep='egrep --color'
alias fgrep='fgrep --color'

# ------------- 命令行使用Coreutils 配色方案 ----------
# 采用Coreutils的gdircolor配色,修改~/.dir_colors(自定义配色)
# 以修改ls命令使用的环境变量LS_COLORS(BSD是LSCOLORS)
# 效果:不同类型的文件有不同颜色,如图水红色,文件夹群青色...
if brew list | grep coreutils > /dev/null ; then
    PATH="$(brew --prefix coreutils)/libexec/gnubin:$PATH"
    alias ls='ls -F --show-control-chars --color=auto'
    eval `gdircolors -b $HOME/.dir_colors`
fi
使用
使插件修改生效
当修改了正在使用的antigen插件(包括主题)的源代码后, 要运行antigen reset, 以重新加载antigen插件, 而后登录一个新的shell, 才能更新此插件.
tmux启动设置
- 令tmux启动pane时开zsh,而不是开shell (Linux中会遇到,mac中不会,但也可做此设置)
vim ~/.tmux.conf加一行
# 开一个窗口,自动启动zsh作为shell
set-option -g default-shell /bin/zsh则重启tmux,或在tmux的窗口中,执行ctrl+b :source-file ~/.tmux.conf,更改即生效
卸载antigen
rm ~/.antigen -rf
rm ~/.local -rf # 删前手动检查一下,其下是否有不是antigen的文件
zsh插件推荐
fzf: 模糊查找 历史命令/下方路径 等
- fzf的主项目: fzf的github
- fzf的周边: fzf相关项目 fzf-tab fzf-widgets
安装方法:
.zshrc中加入
check_fzf_install()
{
    if [ "$(uname)" = "Darwin" ]; then
    # for mac
        if ! [ -x "$(command -v fzf)" ]; then
        # if ! builtin type fzf >/dev/null 2>&1; then
            if [ -x "$(command -v brew)" ]; then
                brew install fzf
            else
                echo 'There is no brew on your mac; cannot `brew  install fzf`' >&2
            fi
        fi
    else
    #  for unbuntu, debian
        export FZF_BASE="~/.fzf"
        if [ ! -x $FZF_BASE/bin/fzf ] 2>&1; then
            echo 'There is no fzf. Installing to '"$FZF_BASE" >&2
            git clone --depth 1 https://github.com/junegunn/fzf.git $FZF_BASE
            $FZF_BASE/install --bin
        fi
    fi
}

# ....

check_fzf_install
antigen bundle fzf

# antigen bundle 其他zsh插件

antigen apply-
无需执行:
$FZF_BASE/install, 这个程序会:创建
~/.fzf.zsh: 以加载fzf, 定义快捷键 for 历史命令模糊搜索等的操作 在shell下,给
~/{.bashrc,.zshrc}添加[ -f ~/.fzf.zsh ] && source ~/.fzf.zsh -
而
antigen bundle fzf命令同样会做上述操作
历史目录跳转
比较各种历史目录跳转的插件, 推荐 z.lua:
- 搜索速度:
z.lua是z的三倍, 是autojumpfasd的十多倍 - 调用
fzf在交互模式下模糊查找历史路径:z.lua,fzf-z都可以, 但fzf-z调用的是z z.lua功能最丰富: 可以搜 按近期且高频排序的历史路径, 按时间排序的历史路径, 当前路径子历史路径, 当前路径的父路径
z.lua
安装方法
在 .zshrc 中加入
# --------------------------------------------------------

antigen bundle skywind3000/z.lua
export _ZL_ADD_ONCE=1   # 若为0 则prompt显示一次则计数加1, 若为1则 cd到目录一次则计数加1
export _ZL_MATCH_MODE=1 # 启用增强匹配模式
export _ZL_NO_ALIASES=0 # 不用预设alias, 用自己定义的alias

# antigen bundle 其他zsh插件

antigen apply

# --------------------------------------------------------
# 定义z的alias

unalias z
alias zz=_zlua

z()
{
    if [[ "$1" =~ '^(-h|--help)$' ]]; then
        cat << EOF
_zlua [-c] 的封装的帮助:
    z [options] [.] 路径中间字段 路径中间字段 路径结尾字段
    z [options] [.] 路径中间字段 路径中间字段 路径未必结尾字段 $
    z [options] [.] 路径中间字段 路径中间字段 /
    加 . : 从当前路径往下匹配
_zlua [其他option] 没有封装
EOF
        echo
        echo 原生的帮助:
        _zlua -h
    elif [ "$1" = '.' ]; then
        shift  # z匹配当前路径 的历史子路径 -> fzf模糊匹配
        if [ $# -eq 0 ]; then
            _zlua -I -c .
        else
            _zlua -I -c "$@"
        fi
    elif ! [[ "$1" =~ '^-' ]]; then # z匹配历史路径, 按访问频率排序 -> fzf模糊匹配
        if [ $# -eq 0 ]; then
            _zlua -I .
        else
            _zlua -I "$@"
        fi
    else
        _zlua "$@"
    fi
}

alias z..='_zlua -b' # 跳转到父目录中 名称含foo的那一级

zh(){        # z匹配历史路径, 按之间排序 -> fzf模糊匹配
    if [ $# -eq 0 ]; then
        _zlua -I -t .
    else
        _zlua -I -t "$@"
    fi
}
zle -N zh
bindkey '^h' zh
autojump
antigen无法自动安装autojump,故需要手动安装之,然后加入autojump的搜索路径
安装
autojump 是一个命令行工具,它允许你可以直接跳转到你喜爱的目录,而不受当前所在目录的限制
首先安装autojump,如果你用 Mac,可以使用 brew 安装:
brew install autojump如果是 Linux,去下载 autojump 的最新版本
# 在任意一个目录下
git clone git://github.com/joelthelion/autojump.git
cd autojump
./install.py安装成功会返回如下,要用autojump命令,需先. ~/.autojump/etc/profile.d/autojump.sh
Please manually add the following line(s) to ~/.zshrc:

    [[ -s ~/.autojump/etc/profile.d/autojump.sh ]] && source ~/.autojump/etc/profile.d/autojump.sh

    autoload -U compinit && compinit -u

Please restart terminal(s) before running autojump.
autojump 安装到~/.autojump/,下载得的 autojump/可删
rm autojump配置
- Linux需要先改antigen搜索autojump安装路径的脚本
vim ~/.antigen/bundles/robbyrussell/oh-my-zsh/plugins/autojump/autojump.plugin.zsh# 文件开头改成
if [ -f $HOME/.autojump/etc/profile.d/autojump.sh ]; then # manual user-local installation
. $HOME/.autojump/etc/profile.d/autojump.sh
elif [ $commands[autojump] ]; then # check if autojump is installed而后修改~/.zshrc
# 搜索"antigen use oh-my-zsh",其下一行加
antigen bundle autojump # 使用 antigen 加载 zsh;注释此行则不加载若设置为要加载,重新登录zsh则autojump命令生效
- Mac直接改
~/.zshrc即可
使用
zsh语法高亮
推荐 fast-syntax-highlighting , 它是 zsh-syntax-highlighting 的升级版, 支持更丰富的语法高亮
fast-syntax-highlighting
安装方法
在 .zshrc 中加入
antigen bundle zdharma/fast-syntax-highlighting    # zsh 命令的语法高亮
# antigen bundle 其他zsh插件
antigen apply

# -----------------
# 设置 zdharma/fast-syntax-highlighting 的主题
fast-theme <fast-syntax-highlighting内置theme> >/dev/null
fast-theme <path-to-your-theme>/<your_theme>.ini >/dev/null自定义theme详见fast-syntax-highlighting 的 github - 安装教程
zsh-syntax-highlighting
安装方法
在 .zshrc 中加入
antigen bundle zsh-users/zsh-syntax-highlighting # zsh 命令的语法高亮
# antigen bundle 其他zsh插件
antigen apply
# -----------------
# 设置 zsh-users/zsh-syntax-highlighting 的主题

# syntax color definition
ZSH_HIGHLIGHT_HIGHLIGHTERS=(main brackets pattern)

typeset -A ZSH_HIGHLIGHT_STYLES

ZSH_HIGHLIGHT_STYLES[default]=none
ZSH_HIGHLIGHT_STYLES[unknown-token]=fg=009
ZSH_HIGHLIGHT_STYLES[reserved-word]=fg=red,bold  # =fg=009,standout
ZSH_HIGHLIGHT_STYLES[alias]=fg=cyan,bold
ZSH_HIGHLIGHT_STYLES[builtin]=fg=cyan,bold
ZSH_HIGHLIGHT_STYLES[function]=fg=cyan,bold
ZSH_HIGHLIGHT_STYLES[command]=fg=white,bold
ZSH_HIGHLIGHT_STYLES[precommand]=fg=white,underline
ZSH_HIGHLIGHT_STYLES[commandseparator]=none
ZSH_HIGHLIGHT_STYLES[hashed-command]=fg=009
ZSH_HIGHLIGHT_STYLES[path]=fg=214,underline
ZSH_HIGHLIGHT_STYLES[globbing]=fg=063
ZSH_HIGHLIGHT_STYLES[history-expansion]=fg=white,underline
ZSH_HIGHLIGHT_STYLES[single-hyphen-option]=none
ZSH_HIGHLIGHT_STYLES[double-hyphen-option]=none
ZSH_HIGHLIGHT_STYLES[back-quoted-argument]=none
ZSH_HIGHLIGHT_STYLES[single-quoted-argument]=fg=063
ZSH_HIGHLIGHT_STYLES[double-quoted-argument]=fg=063
ZSH_HIGHLIGHT_STYLES[dollar-double-quoted-argument]=fg=009
ZSH_HIGHLIGHT_STYLES[back-double-quoted-argument]=fg=009
ZSH_HIGHLIGHT_STYLES[assign]=none
zsh的自动补全
复用现有命令的自动补全
在~/.bash_aliases中设置
- 凡如下设置的
[新命令]会自动继承[现有命令]的zsh自动补全
alias [新命令]='[现有命令] ...其他参数'[新命令](函数)继承[现有命令]的zsh自动补全
# 该alias会使得 [新命令] 继承[现有命令]的zsh自动补全
alias [新命令]='[现有命令]'
# 该函数会覆盖'alias [新命令]'
function [新命令]()
{
  ...
}
zsh语法和bash的区别
判断是在哪种shell下
以下对 bash, zsh, sh均适用
| 类型 | flag 变量/flag命令 | $SHELL |
$ZSH_NAME 或 $ZSH_VERSION 是否未定义 |
$BASH_VERSION 是否未定义 |
ps -p $$ | tail -n1 | awk '{printf $4} | sed -E 's/^\-//‘' |
|---|---|---|---|---|---|
| 非登录或非登录式 交互式 |
不论是登录shell1, 还是运行<shell1>进入shell1在shell1下, 直接输出 flag 变量或运行flag命令 |
shell1 | 当且仅当shell1=zsh时有定义 | 当且仅当shell1=bash时有定义 | 返回字符串 “<shell1>” |
| 登录式 非交互式 |
在shell0 下 执行ssh <服务器> echo flag变量ssh <服务器> flag命令服务器默认用shell1 |
shell1 | 当且仅当shell1=zsh时有定义 | 当且仅当shell1=bash时有定义 | 返回字符串 “<shell1>” |
| 非登录式 非交互式 |
在shell0下, 执行命令<shell1> -c '命令'在shell0下, 执行 <shell1> 文件注意 ./文件 等价于 sh 文件 |
shell0 | 当且仅当shell0=zsh时有定义 | 当且仅当shell0=bash时有定义 | 返回字符串 “<shell1>” |
建议:
ps -p $$ | tail -n1 | awk '{printf $4}' | sed -E 's/^\-//'会返回字符串“<shell1>”, 适用最广的方法, shell1可以为sh/bash/zsh等, 一般就用之.ps -p $$ | tail -n1 | awk '{printf $4}’在交互式zsh下返回”-zsh”, 在非交互式zsh下返回”zsh”.
注意:
-
单独运行
<shell1> -c 'ps -p $$’, 则会返回如下形式, 其中不包含<shell1>PID TTY TIME CMD 75670 ttys007 0:00.03 ps -p 75670 -
运行
<shell1> -c '一组命令’, 一组命令里包含ps -p $$一组命令:
- 可以是用管道组合起来
- 也可以是用
;组合起来 - 还可以是包含了重定向, 例如
ps -p $$ 2>&1
则会返回如下形式, 其中包含
<shell1># PID TTY TIME CMD # 76074 ttys007 0:00.03 bash -c 一组命令例如
bash -c 'ps -p $$ 2>&1'
# 返回
#  PID TTY           TIME CMD
# 76074 ttys007    0:00.03 bash -c ps -p $$ 2>&1
bash -c 'echo 1; ps -p $$'
#  PID TTY           TIME CMD
# 76147 ttys007    0:00.03 bash -c echo 1; ps -p $$
感叹号
zsh的感叹号不论是否在方括号内,都是表示历史记录功能
bash的感叹号在方括号内表示非,不在方括号内时表示历史记录
例如输出当前目录下所有隐藏文件与文件夹
echo .[!.]*
# bash下正常执行,输出当前目录下所有隐藏文件与文件夹
# zsh下报错
#     zsh: event not found: .]
# 这是因为zsh把`!.]`理解成以`.]`开头的历史命令
echo .['!'.]*
# bash下正常执行,输出当前目录下所有隐藏文件与文件夹
# bash下输出
#      ..
# 这是因为bash把`.['!'.]* `理解成第一个字符是".",第二个字符是引号感叹号或句点,而后是任意字符(可空)zsh中:.*等价于.['!'.]* ,都不包含..,只包含此目录下所有隐藏文件与文件夹
bash中:.*包含都不包含..和此目录下所有隐藏文件与文件夹;.[!.]* 才不包含..,只包含此目录下所有隐藏文件与文件夹
shell的状态类型
预备知识——shell的状态类型
| 交互 | 非交互 | |
|---|---|---|
| 登录 | ssh登录服务器; 打开iTerm2登录笔记本 | ssh <服务器> <命令> |
| 非登录 | zsh或bash |
zsh或bash -c '<命令>'或zsh或bash 文件 |
判断登录/交互的方法
| bash | zsh | |
|---|---|---|
| 是否是登录且交互 | if [[ $0 = -* ]] 或if [[ $(shopt login_shell) = *on ]] |
if [[ -o login ]] |
| 是否交互 | if [[ $- = *i* ]] |
if [[ -o interactive ]] 或 if [[ $- = *i* ]] 或 `if [ “${ZSH-no}” != no ] |
在任何bash环境下,以下两种的结果相同
- 文件中写<判断命令>再
. 文件 - 直接执行<判断命令>
示例
- bash
| 场景 \ 返回 \ <命令> | echo $- |
echo $0 |
echo ${BASH-no} |
是否是登录 | 是否交互 |
|---|---|---|---|---|---|
| bash 为默认shell,ssh登录后,执行命令 | himBH | -bash | /bin/bash | yes | yes |
ssh登录后,bash 后,执行命令 |
himBH | bash | /bin/bash | no | yes |
ssh <服务器> <命令>, bash 为服务器默认shell |
hBc | bash | /bin/bash | yes | no |
bash -c '<命令>' |
hBc | bash | /bin/bash | no | no |
在当前位置执行bash 文件,文件中有<命令> |
hB | <文件相对当前位置的路径> | /bin/bash | no | no |
- zsh
| 场景 \ 返回 \ <命令> | echo $- |
echo $0 |
echo ${ZSH-no} ) |
是否是登录 | 是否交互 |
|---|---|---|---|---|---|
| zsh为默认shell,ssh登录后,执行命令 | 3569JNRXZghiklms | -zsh | /Users/mac/.antigen/bundles/robbyrussell/oh-my-zsh | yes | yes |
ssh登录后,zsh 后,执行命令 |
3569JNRXZghikms | zsh | /Users/mac/.antigen/bundles/robbyrussell/oh-my-zsh | no | yes |
ssh <服务器> <命令> |
569X | zsh | no | yes | no |
zsh -c '<命令>' |
569X | zsh | no | no | no |
在当前位置执行zsh 文件,文件中有<命令> |
569X | <文件相对当前位置的路径> | no | no | no |
注:
${variable-xxxx}: 若变量variable无定义, 则返回“xxxx”, 有定义则返回${variable}
判断是否直接输出到终端
[ -t 1 ] 用于判断当前命令/脚本是否输出到终端,而非输出到pipe或文件。不能用来判断当前是否在交互式shell下。
比如,在temp.sh文件写如下内容
[ -t 1 ] && echo 直接输出到终端
[[ $- = *i* ]] && echo 交互式终端
则
bash temp.sh # 返回  直接输出到终端,不返回 交互式终端
bash temp.sh | cat # 返回空
bash temp.sh > a; cat a # 返回空因此,不能用 [ -t 1 ]判断当前是否是交互式终端。
zsh和bash共存的用户目录组织逻辑
- 各种shell的dot 文件
- CONF、shareENV、serverENV、localENV分开
文件夹结构
/home/$USER/
    一堆软链接点文件,指向CONF下的文件,详见下[#软连接]
    init_script/
        系统环境安装脚本
    ENV/
        CONF/
            一堆软链接点文件,指向shareENV、serverENV、localENV下的文件,详见下[#软连接]
        shareENV/     ------- 一个repo,笔记本、服务器共用,每次登录登出时同步
            local/
                bin/
                man/
                ...
            script/
            shell_config/
                zsh、bash、所有shell通用的点文件
            app_config/
                tmux、ipython、jupyter通用的点文件
        serverENV/    ------- 一个repo,服务器共用,每次登录登出时同步
            (结构同shareENV/)
            app_config/
                .shadowsocks    : shadowsocks ips
            nvim/             : neovim 的镜像及其解压文件夹
            ...
        localENV/     ------- 一个文件夹,该服务器自己用的,不同步
            (结构同shareENV/)
        其他共享ENV ------- 一个repo,在我的一些电脑之间共用,每次登录登出时同步
            (结构同shareENV/)
我设计的点文件的加载逻辑
执行顺序从上到下
| 执行场景 | 自定义共用文件 | zsh | bash |
|---|---|---|---|
| 总执行 | .env: 定义环境变量、定义登录登出的文件同步函数;非交互则加载.aliases | .zshenv: 总是触发; 加载.env | .bash_env: 登录但非交互 触发; 加载.env |
| .aliases: 包括别名和shell函数 | |||
| 登录 | .login: git pull共享文件 | .zprofile: 登录触发;加载.login | .bash_profile: 登录触发; 加载.bash_env, .login, .bashrc |
| 交互 | 无 | .zshrc: 交互触发; 交互则加载.aliases | .bashrc: 非登录但交互 触发; 若非登录则加载.bash_env, 交互则加载.aliases |
| 登出 | .logout: git push共享文件; 打扫卫生 | .zlogout: 登出触发;加载.logout | .bash_logout: 登出触发;加载.logout |
触发:即系统自动加载此文件的触发条件
加载:即在此文件内,source了别的文件
登出:不论是敲命令(exit logout reboot)登出,还是ssh连接中断(如客户端直接关闭iTerm窗口、断网),都会触发登出文件。
特别设置
bash的非交互需要额外设置
-
登录式的非交互: 若bash是默认shell,
ssh <服务器> <命令>,不执行~/.bash_env,没有找到办法;只能ssh <服务器> '. ~/.bash_env && <命令>’ -
非登录式的非交互:
bash -c '<命令>'或bash 文件,在.env中添加一行:export BASH_ENV=~/.bash_env # 可登录后,非交互bash加载之
zsh 在上述情况都会自动加载~/.zshenv,无需另外设置
软链接
$HOME/
$HOME=/home/$USER/ENV/CONF
$shareENV=/home/$USER/ENV/shareENV
$serverENV=/home/$USER/ENV/serverENV
| 源文件 | 目标文件 |
|---|---|
$HOME/ |
$shareENV/app/ |
| .gitignore_global | …/shareENV/app_config/.gitignore_global |
| .gitconfig | …/shareENV/app_config/.gitconfig |
| .ipython | …/shareENV/app_config/.ipython/ |
| .jupyter | …/shareENV/app_config/.jupyter/ |
| .tmux.conf | …/shareENV/app_config/.tmux.conf |
| .vimrc.bundles | …/shareENV/app_config/vim/.vimrc.bundles |
| .vim | …/shareENV/app_config/vim/.vim/ |
| .vimrc | …/shareENV/app_config/vim/.vimrc |
$HOME/ |
$serverENV/app/ |
| .shadowsocks | …/serverENV/app_config/.shadowsocks/ |
$HOME/ |
$shareENV/shell_config/ |
| .autojump | …/shareENV/shell_config/.autojump/ |
$HOME/ |
$$ENV/.shell_config/ |
| .env | …/CONF/.shell_config/.env |
/home/$USER/
| 源文件 | 目标文件 |
|---|---|
/home/$USER/ |
$HOME |
| .bash_env | ENV/CONF/.bash_env |
| .bash_history | ENV/CONF/.bash_history |
| .cache | ENV/CONF/.cache/ |
| .env | ENV/CONF/.shell_config/.env |
| .bash_profile | ENV/CONF/.bash_profile |
| .ssh | ENV/CONF/.ssh/ |
| .zcompdump | ENV/CONF/.zcompdump |
| .zshenv | ENV/CONF/.zshenv |