hexo博客搭建与升级
安装环境
node
node.js, 简称node, 是一个开源与跨平台的JavaScript运行时环境. 博客框架hexo依赖node环境.
安装node
brew install node这一命令同时安装了node, 及其node的默认包管理器npm
npm
npm是node的默认包管理器
安装npm
在前面安装node时, 也自动同时安装了npm
修改npm源
国外的NPM源并不稳定,即使翻墙也不一定能将Hexo下载下来,所以这里将npm全局修改为淘宝源
npm config set registry https://registry.npm.taobao.org查看源是否可有
npm info underscore如果上面配置正确这个命令会有字符串response. 不然会有如下的报错:
npm ERR! registry error parsing json
npm ERR! Unexpected end of JSON input
换回官方的源
npm config set registry https://registry.npmjs.org/查看源的url
npm config get registrynpm使用
装包
sudo npm i[nstall] -g <包名> # -g 表示全局装包, 必需有sudo权限
sudo npm install --save # 安装 package.json 中的npm包
npm i[nstall] <包名> --save # 仅当前项目装包, --save或-S, 表示将包的变更, 保存到当前项目根目录/package.json
npm install --save # 安装 package.json 中的npm包
删包
sudo npm un[install] -g <包名> # -g 表示全局删包, 必需有sudo权限
npm un[install] <包名> --save # 仅当前项目删包, --save或-S, 表示将包的变更, 保存到当前项目根目录/package.json
查看包
npm ls [--depth <n>] # 包的嵌套展开到第n层hexo
安装hexo
安装全局的hexo-cli
npm install -g hexo-cli初始配置
创建hexo项目
创建hexo项目文件夹
hexo init <hexo根目录> # 创建新hexo项目文件夹
cd <hexo根目录>
npm install --save # 安装 package.json 中的npm包
git配置
在github网页创建新repo <github-repo-name>
git init
git add -A .
git commit -m 'first commit'
git remote add origin git@github.com:<github-username>/<github-repo-name>.git
git push -u origin master
安装npm包
在<新hexo根目录>运行, 以下配置需要hexo>=5.0, next>=8
以下配置
# 搜索引擎站点地图生成
npm install hexo-generator-sitemap --save
npm install hexo-generator-baidu-sitemap --save
# 站点地图主动推送给百度
npm install hexo-baidu-url-submit --save
# 换主题
npm uninstall hexo-theme-landscape --save
npm install hexo-theme-next --save
## 代码高亮: 使用next不自带的prism主题, 才需要安装
# npm install prism-themes --save
# 评论区
npm install @waline/hexo-next --save
# npm install hexo-next-valine --save
# 部署器
npm install hexo-deployer-git --save
# 图像懒加载
npm install lozad --save
# 渲染本地图像
npm install github:hyliang96/hexo-asset-image --save # 与hexo-abbrlink兼容,与hexo5兼容
# 计时器
npm install hexo-symbols-count-time --save
# 本地搜索
npm install hexo-generator-searchdb --save
# 渲染器
npm uninstall hexo-renderer-marked --save # 卸载默认渲染器,
npm install hexo-renderer-markdown-it --save # 新渲染器, 支持参考文献引用和章节标题的锚点
## npm install markdown-it-mathjax --save # 公式渲染插件, 无需安装, next>=8 自带公式渲染器
# 文章摘要
npm install hexo-excerpt --save          # 按限量个html的tag来截取
## npm install hexo-auto-excerpt --save  # 按限量字符截取
# 玩偶
npm install hexo-helper-live2d --save
npm install live2d-widget-model-tororo --save
# 检查坏了的链接文件
# npm install hexo-broken-links-checker --save
# 自动生成文章链接
npm install github:hyliang96/hexo-abbrlink --save
# 支持.textpack压缩包文件(内含插入的图片)
# npm install hexo-renderer-textpack --save
# 文章置顶, 可以置顶多篇文章, 在要置顶的文章的title写"sticky: xxx", xxx是数字, 如100, 越大越往上排
npm install hexo-generator-index --save
关于配置文件的说明
-
迁移配置文件:
# 在新hexo根目录下
cp <旧hexo根目录>/_config.yml _config.yml
从hexo>=5.0开始, 就能实现主题配置 与 主题项目目录 相隔离:
-
安装主题: 不需要像过去一样, 手动git clone主题项目了
git clone <主题的github-repo> themes/<主题名>而是直接用npm安装主题, 例如如下安装
next主题readmenpm install hexo-theme-next@latest --save安装到
<hexo根目录>/node_modules/hexo-theme-next/, 这是next的项目文件夹.不要直接在此文件夹中改配置, 而是在
<hexo根目录>和<hexo根目录>/source/_data下添加用户配置, 去覆盖next项目文件夹的配置.这样可以实现 主题配置 与 主题项目目录 相分离, 用
npm升级主题, 不改变主题配置. -
配置主题: 不需和过去一样修改
themes/next/_config.yml, 而是如下操作, 然后编辑_config.next.yml# 在新hexo根目录下 cp <旧hexo根目录>/node_modules/hexo-theme-next/_config.yml _config.next.yml -
在
<hexo根目录>/source/_data添加用户配置, 去覆盖原有配置 (就是说, 用户配置了的变量, 按用户配置来, 用户没有配置的变量, 按默认配置来)-
修改背景图像: 参考这篇文章 创建
<hexo根目录>/source/_data/styles.styl, 能起到 ``<hexo根目录>/node_modules/hexo-next-theme/source/css/_custom/custom.styl` 的作用 -
修改字体: 参考这篇文章 创建
<hexo根目录>/source/_data/variables.styl, 能覆盖<hexo根目录>/node_modules/hexo-next-theme/source/css/_variables/*.styl中的默认配置 -
启用上述修改: 在
_config.next.yml中将上述改过的文件接触注释:custom_file_path: #head: source/_data/head.njk #header: source/_data/header.njk #sidebar: source/_data/sidebar.njk #postMeta: source/_data/post-meta.njk #postBodyEnd: source/_data/post-body-end.njk #footer: source/_data/footer.njk #bodyEnd: source/_data/body-end.njk #variable: source/_data/variables.styl #mixin: source/_data/mixins.styl style: source/_data/styles.styl -
设置博客菜单(menu)中条目的中文名: 在
<hexo根目录>/source/_data/languages.yml设置的menu中文名如下, 只需要添加要修改中文名的条目, 不用把<hexo根目录>/themes/next/anguages/zh-CN.yml全部粘过来再改, 也不用直接改后者文件. 这一修改, 无需在_config.next.yml中custom_file_path:项将languages.yml接触注释, 这是hexo自带的功能, 详见hexo的language.yml和next的language.yml.zh-CN: menu: home: 首页 archives: 时序 categories: 分类 tags: 标签 about: 关于 search: 搜索 philosophy: 道 academics: 术 tools: 器 book: 书 movie: 影 photo: 相 essay: 杂谈 schedule: 日程 sitemap: 站点地图 commonweal: 公益 404
-
迁移博客
迁移配置
若从hexo<5的旧博客, 迁移到hexo5的新博客, 需要参照旧博客填写新博客的{_config.yml,_config.next.yml}
若从hexo5的旧博客, 迁移到hexo5的新博客, 则运行如下命令
# 在新hexo根目录下
old_hexo_dir=xxxxx
cp ${old_hexo_dir}/{_config.yml,_config.next.yml} .
迁移内容
若此博客要完全迁移内容, 则则执行如下命令, 而后不用做后续的所有操作
cp ${old_hexo_dir}/source/* source若此仅把旧博客的板式迁移到新博客, 则执行如下命令, 而后要做后续的所有操作
cp ${old_hexo_dir}/source/{_data,categories,tags,about} source
mkdir source/images
修改配置
修改_config.yml
108:  repository: git@github.com:hyliang96/hyliang96.github.io.git
215: serverURL: https://waline-hyliang96.vercel.app # Waline server address url修改_config.next.yml
153:  GitHub: https://github.com/hyliang96 || fab fa-github
154:  E-Mail: mailto:hyliang96@gmail.com || fa fa-envelope

409: permalink: https://github.com/hyliang96修改_config.next.yml并更换图标
52:favicon:
53:  small: /images/favicon16.png
54:  medium: /images/favicon32.png
55:  # small: /images/inftyset-favicon-16x16-next.png
56:  # medium: /images/inftyset-favicon-32x32-next.png
57:  apple_touch_icon: /images/favicon.png
58:  safari_pinned_tab: /images/favicon.svg

139:  url: /images/heat.jpg

271:  wechatpay: /images/wechatpay.jpg
272: alipay: /images/alipay.jpg修改source/_data/styles.styl, 并更换背景图像
background:url(/images/backgroud.png);评论区和浏览计数
然后配置_config.yml
215: serverURL: https://xxx-xxx.xxx.app # Waline server address url配置_config.next.yml
leancloud_visitors:
  enable: true
  app_id: 5JGxxxxxxI
  app_key: Jv9xxxxxxEq7
配置域名和搜索引擎
在Freenom域名注册域名, 在cloudflare转发此域名, 然后参考搜索引擎配置搜索引擎
_config.yml
16:url: https://blog.lianghy.ml
251:  host: https://blog.lianghy.ml    # 在百度站长平台中添加的域名
_config.next.yml
482:google_site_verification: googleaxxx.html
494:baidu_site_verification: baidu_verify_code-xxxx.html
更换文件
source/{CNAME,googleaxxx.html,baidu_verify_code-xxxx.html}
渲染
本地预览
hexo clean && hexo g && hexo s部署到github
部署到https://<github用户名>.github.io
依照此步骤和部署github pages完成github-page的配置
然后在本地<hexo根目录>执行部署
hexo clean && hexo g && hexo d升级
步骤: 升级node->升级npm->
- 小版本升级hexo, 若无法正常渲染, 则另起新的hexo项目再迁移
- 大版本升级hexo, 若无法正常渲染, 则另起新的hexo项目再迁移
- 另起新的hexo项目再迁移
升级node
# 查看当前node版本
node -v
# 清除npm cache
sudo npm cache clean -f
# 安装多版本node的管理工具"n"
sudo npm install -g n
# 安装最新的稳定版本的node
sudo n stable
# 安装并切换到指定版本的node
sudo n 12.14.1
# 查看所有已经安装的node版本
sudo node ls
# 返回如下, 不会指明当前使用的node版本, 需要用`node -v`来查看当前使用的node版本
# node/12.14.1
# node/14.17.4

# 查看当前node版本
node -v
# 移除指定node版本
sudo n rm 14.17.4
升级npm
查看版本
npm -v升级到最高版本
sudo npm install npm@latest -g小版本升级hexo
升级全局的hexo-cli
sudo npm install hexo-cli -g升级项目内所有npm包
# 查看当前hexo版本, 会列出当项目内hexo(及其构成模块) 和 全局hexo-cli 的版本
hexo version
# 升级当项目内所有的npm包, 包括hexo在内
npm update
# 查看升级后的hexo版本
hexo version
大版本升级hexo
全局安装npm包的大版本升级检查工具ncu
npm install npm-check-updates -g在npm项目文件夹内运行ncu, 以查看当前项目中可升级的npm包
ncu返回
Checking /Users/tommy/blog/package.json
[====================] 16/16 100%

 hexo                    ^4.2.0  →  ^5.0.0
 hexo-generator-sitemap  ^2.0.0  →  ^2.1.0
执行升级
ncu -u返回
Upgrading /Users/tommy/blog/package.json
[====================] 16/16 100%

 hexo                    ^4.2.0  →  ^5.0.0
 hexo-generator-sitemap  ^2.0.0  →  ^2.1.0

Run npm install to install new versions.
当前项目中可升级的npm包
mv node_modules node_modules_old
npm install --save
另起新的hexo项目再迁移
创建新hexo项目文件夹
hexo init <新hexo根目录> # 创建新hexo项目文件夹
cd <新hexo根目录>
npm install --save # 安装 package.json 中的npm包
移动源文件
在<新hexo根目录>运行
rm {scaffolds,source,source,README.md} -rf
cp <旧hexo根目录>/{scaffolds,source,source} .
重新安装npm包
与上文 安装npm包 小节相同
配置新文件
hexo配置:
- 参照
<旧hexo根目录>/_config.yml, 逐行修改<新hexo根目录>/_config.yml
next主题配置:
-
将最新安装的next的配置文件拷贝到
新hexo根目录>: 在<新hexo根目录>运行如下命令cp node_modules/hexo-theme-next/_config.yml _config.next.yml -
参照
<旧hexo根目录>/_config.next.yml, 逐行修改<新hexo根目录>/_config.next.yml
本地渲染并调试bug
通常大版本升级, 会与旧的配置, npm包不兼容, 需要调试bug
hexo clean && hexo g && hexo s重新git配置
cp <旧hexo根目录>/.gitignore .然后与上文git配置相同, 注意, 要创建新的 <github-repo-name>, 不要和旧hexo项目的 <github-repo-name>相同, 不然会带上git臃肿的历史数据.
插件安装说明
插件推荐与参考
评论区
valine是轻量级的第三方评论模块, 后台是LeanCloud. 但由于valine有数据泄露的问题, next v8.1.0开始不支持valine, 需要用valine需安装next-theme/hexo-next-valine插件, 详见.
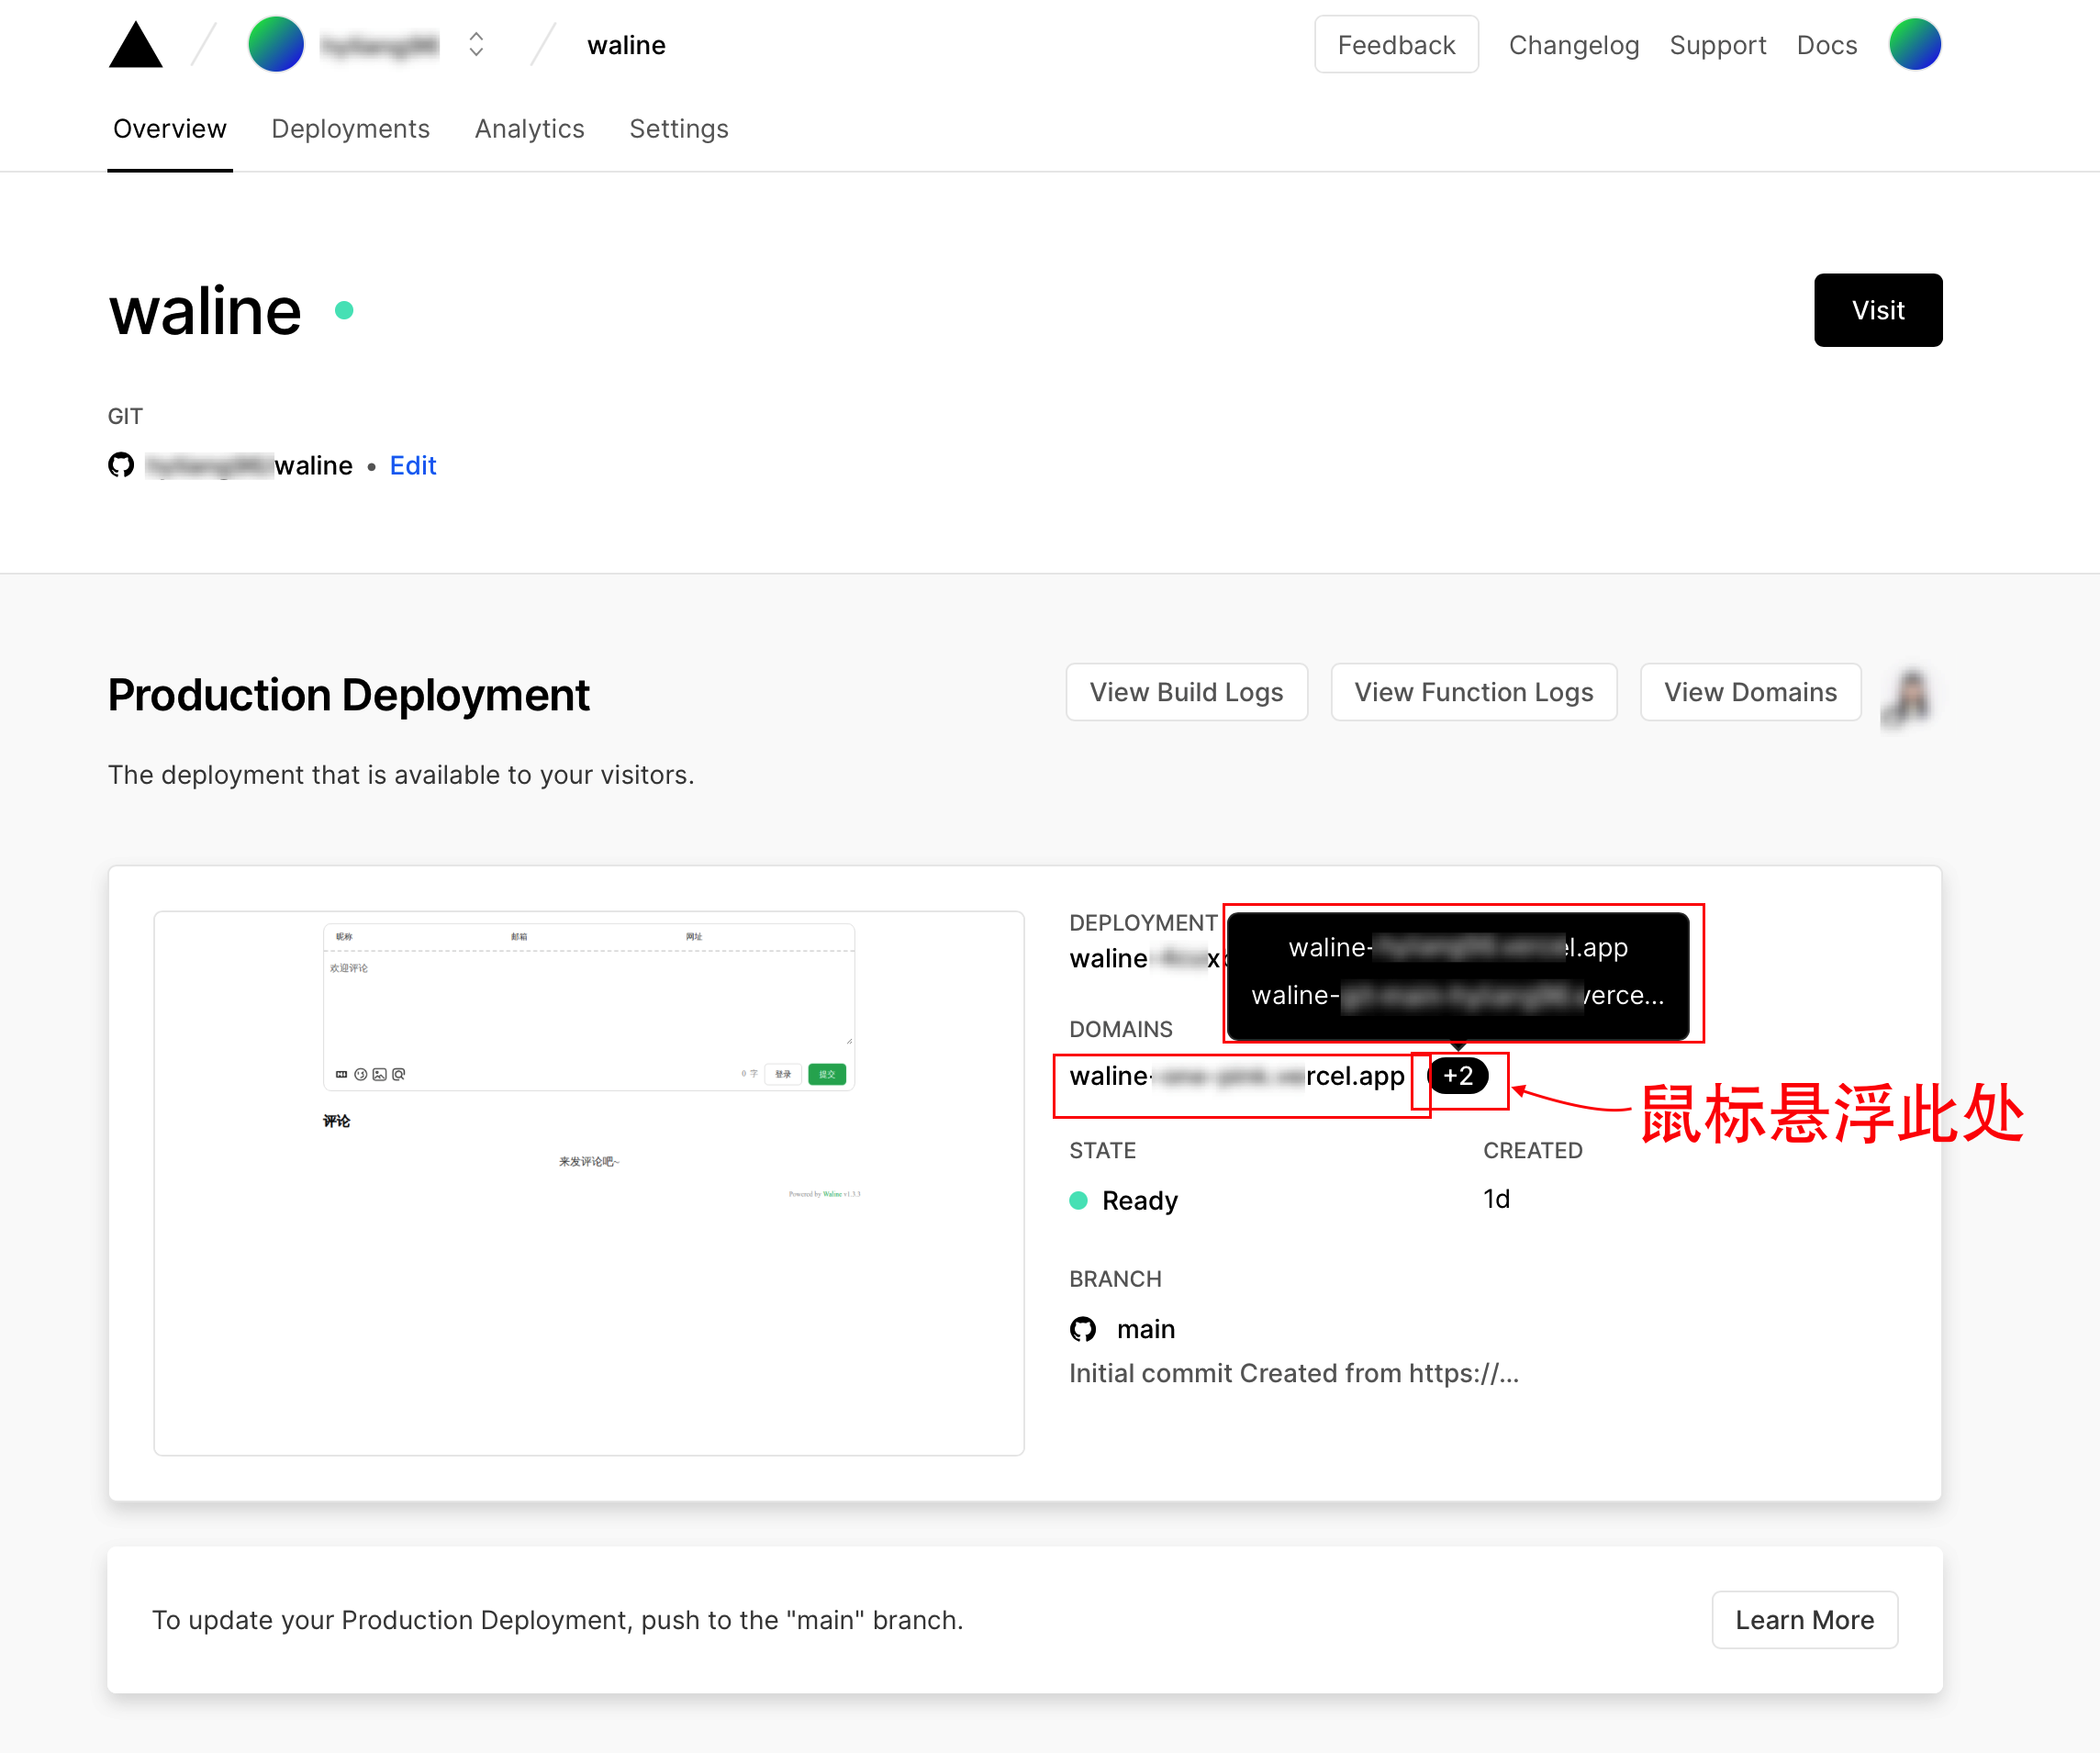
建议使用waline, 它是在valine外面裹了一层Vercel.
- 先依照 waline配置方法配置LeanCloud(使用国际版)和Vercel
- 再依照@waline/hexo-next安装npm插件和配置插件.
- 其中的
serverURL的获得: 访问https://vercel.com/<你的>/waline, 在如下位置选区任意一个url即可
- 其中的
- 访问
<serverURL>/ui, 首次注册的用户, 会成为此waline项目的管理员, 可以删评论
搜索引擎
添加哪个域名
google search console 需要把https://<用户名>.github.io(选网址前缀)添加为站点;不然若用自己注册的域名,添加sitemap.xml会显示“无法获取“。详见
百度站长需要把自己注册的域名添加为站点;不然若用https://<用户名>.github.io,会如下报错
该站点为低质站点,暂不可添加,请持续优化后,再行尝试
或
该主域可添加站点数量超过限制,无法添加更多站点。如您仍需要添加站点,请在已添加站点中删除部分站点后重试。
必须给它套一层自己的域名,才能添加成功。
验证域名归属
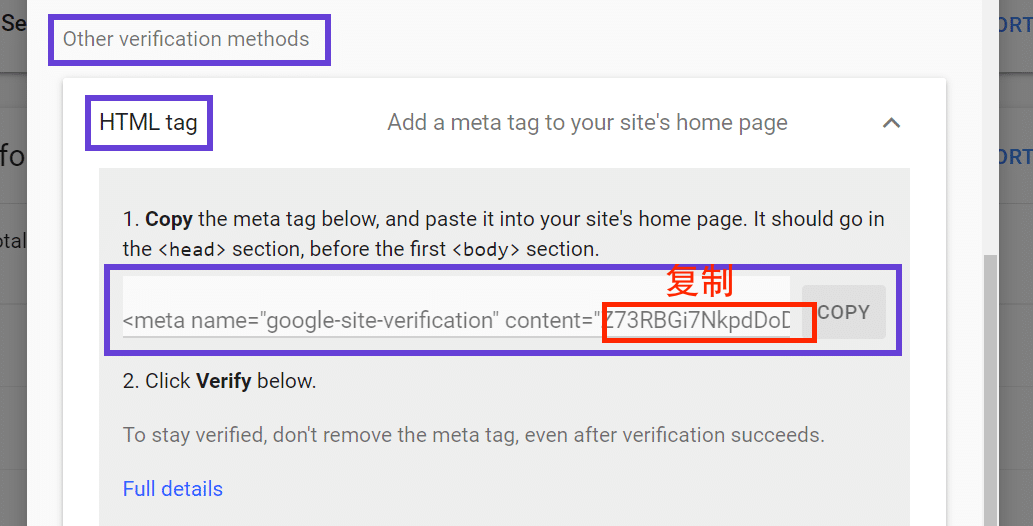
用HTML tag验证(推荐)
google:
百度:
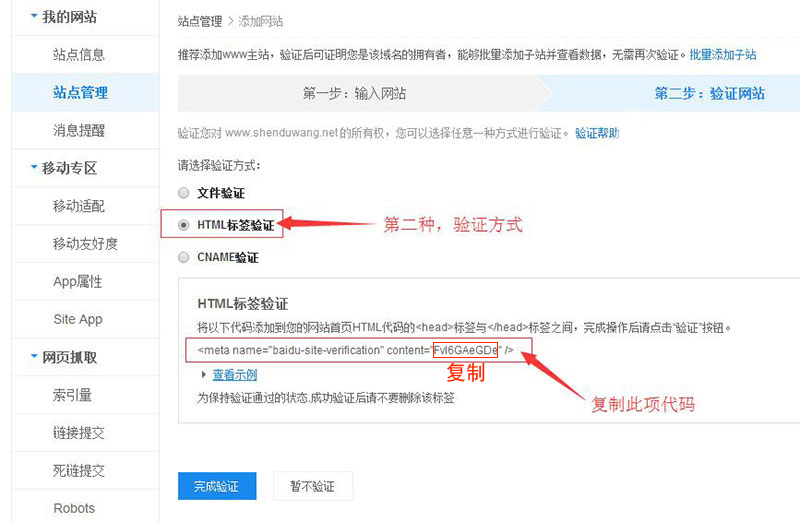
修改_config.next.yml:
google_site_verification: <google粘贴到这里>
baidu_site_verification: <baidu粘贴到这里>
用DNS记录验证网域归属
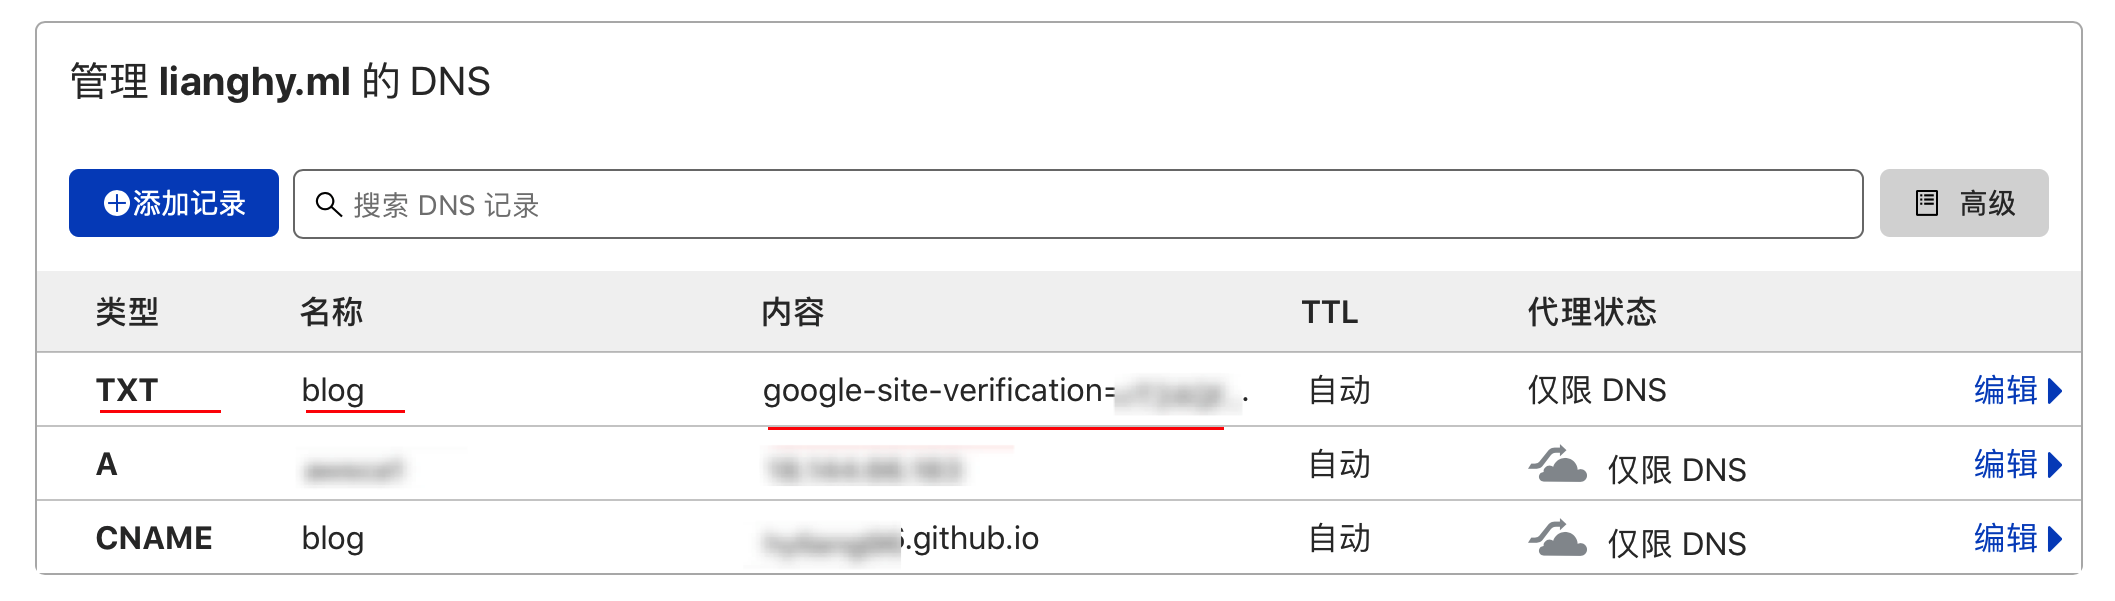
在google验证网域归属时, 需要创建txt类型的dns, 方法如下:
在Google Search Concole, 选择验证网域归属, 点复制
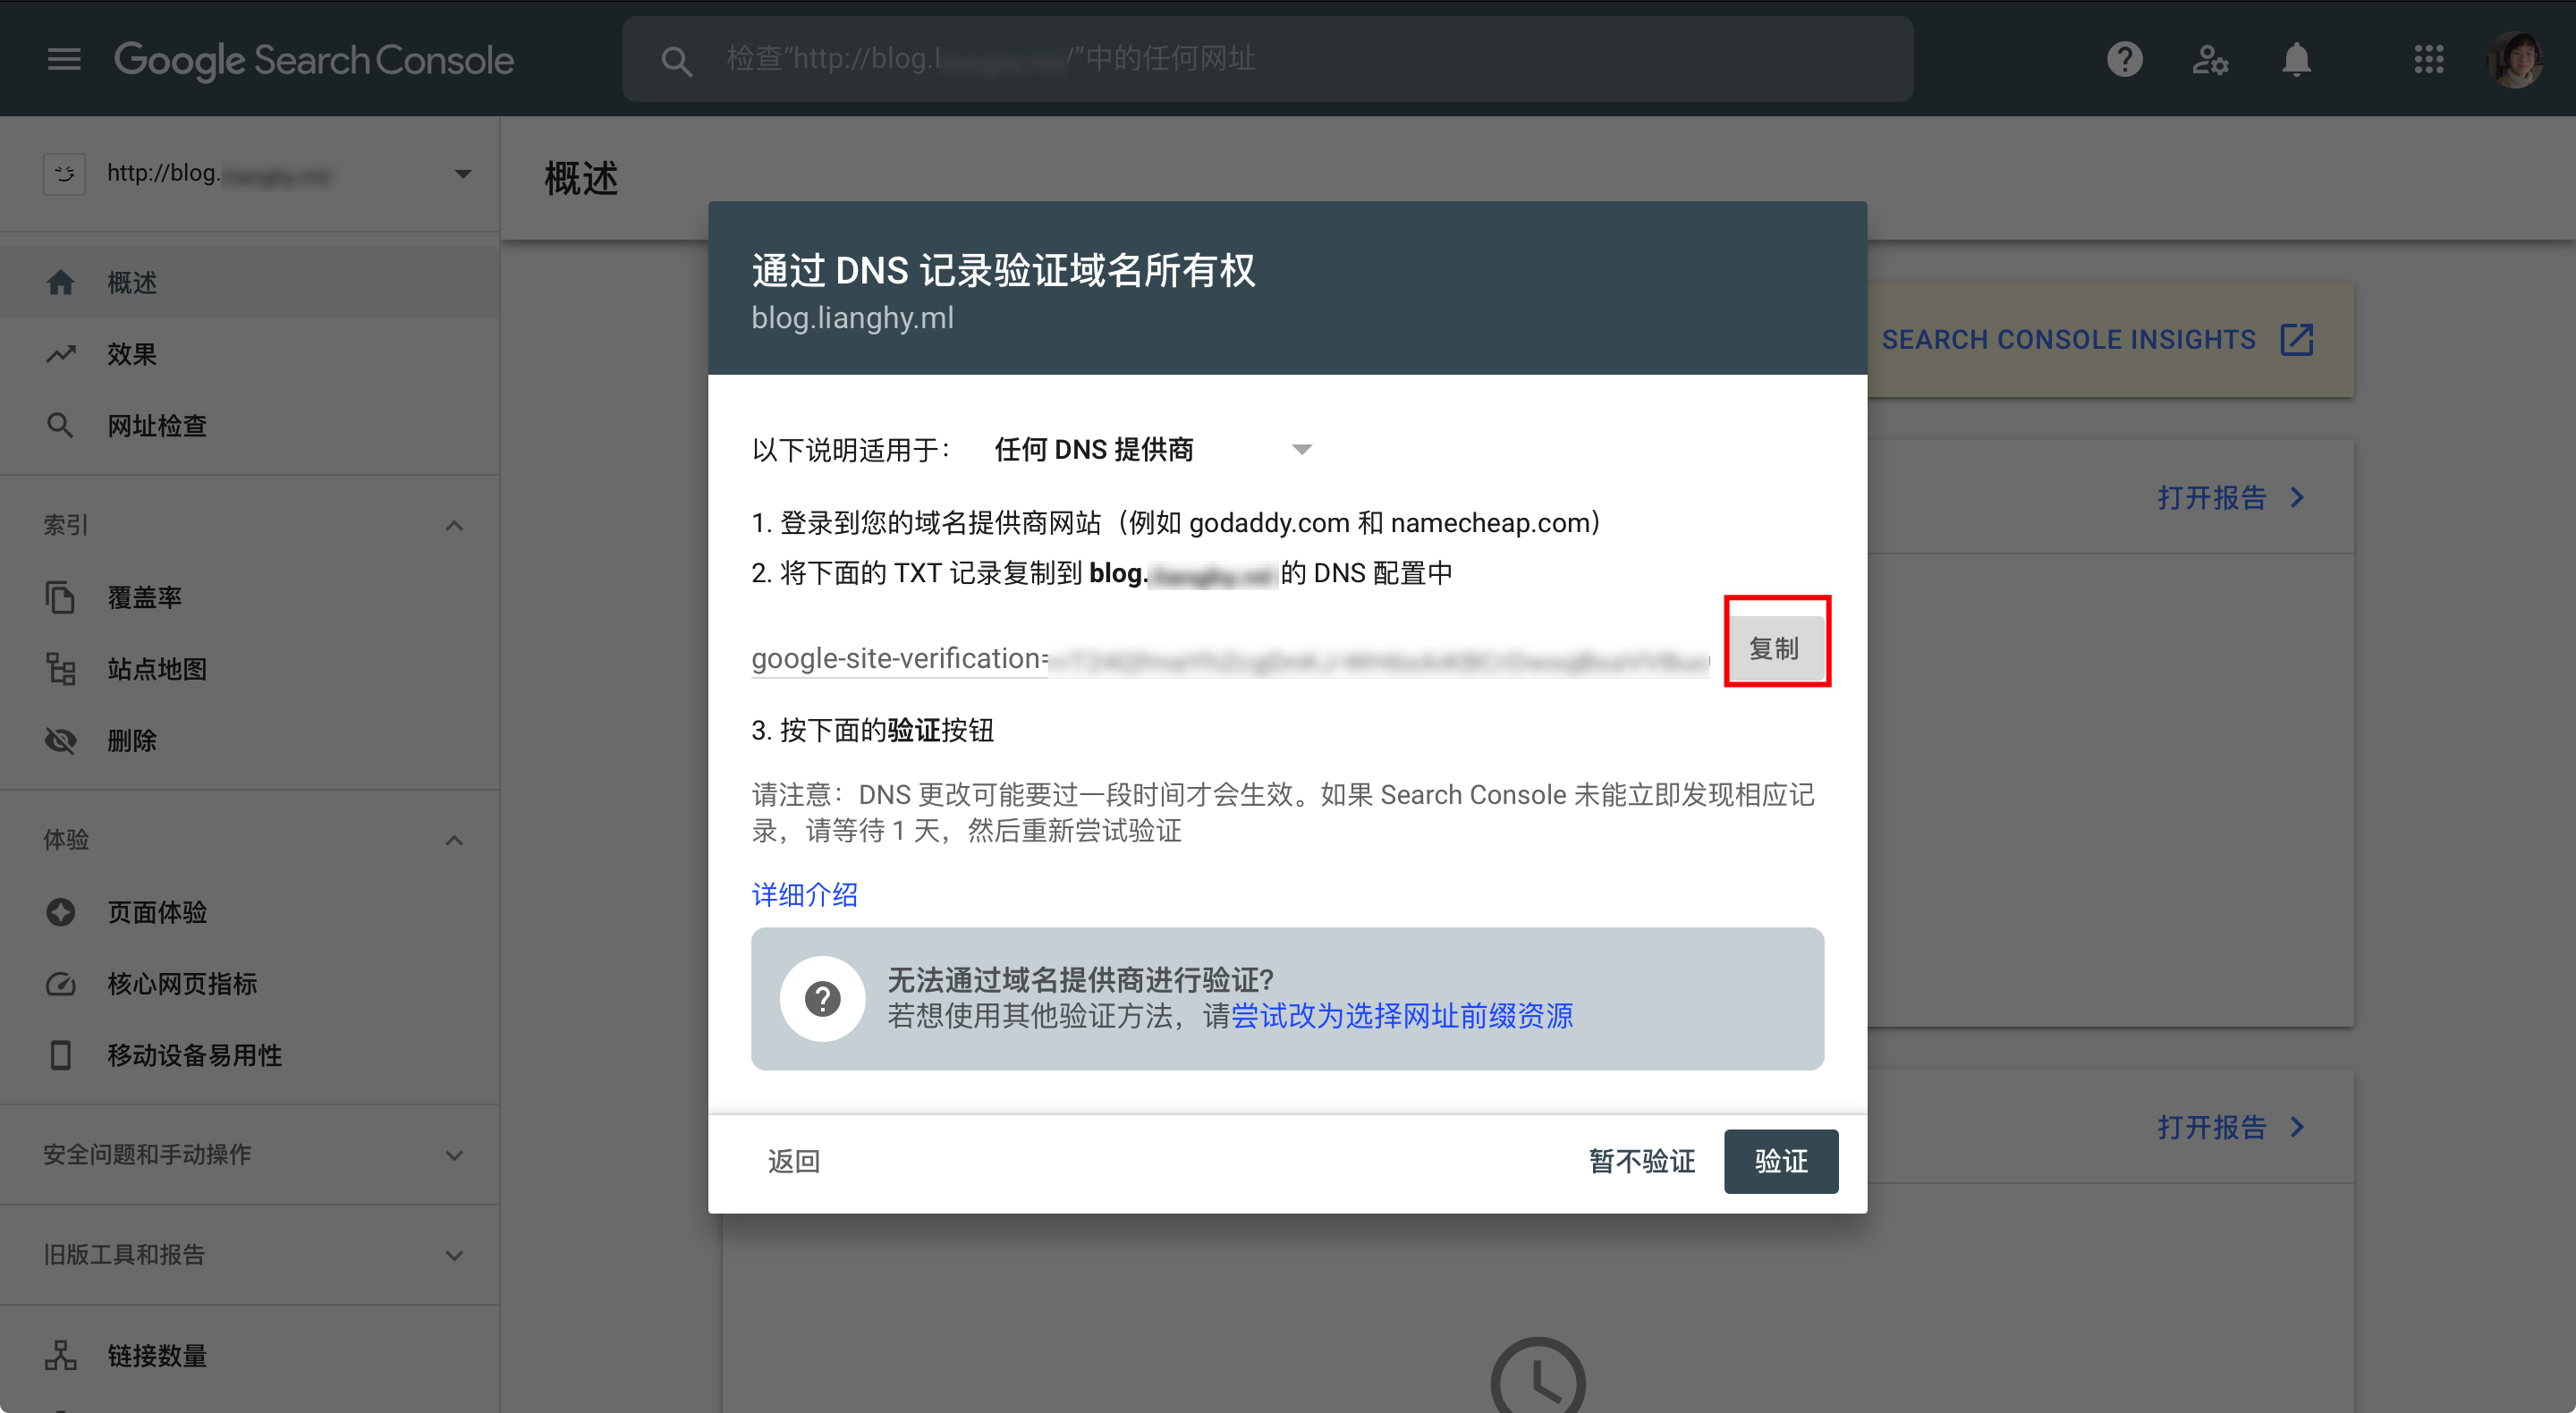
然后前往域名管理网站, 如cloudflare, 添加类型为TXT的一条域名, 名称与博客网址的名称相同, 内容为剪切板内容.
用文件验证网址归属
其中在验证网址归属的时候, 若使用文件来验证, 请将下载的xxx.html文件复制到<hexo根目录>/xxx.html, 并在文件开头加上如下内容, 以便使hexo g时不把此文件渲染成一个博客页面, 而是直接把文件原有内容为博客网址/xxx.html纯文本文件. 可hexo d然后访问博客网址/xxx.html查看是否是纯文本.
---
layout: false
---
文件原有内容
写roboots.txt
写<hexo根目录>/source/robots.txt以告诉搜索引擎的爬虫要爬我这网站的那些内容
因为现在(2019-09以后)Google Search默认是用智能手机引擎来抓取, 写robots.txt时 不要写Disallow, 因为如果js和fonts这些加了disallow的话,会出现谷歌抓取问题
User-agent: *

# 就是告诉搜索引擎的爬虫要爬我这网站的那些内容。
Allow: /
Allow: /archives/
Allow: /categories/
Allow: /tags/
Allow: /about/

# 因为现在(2019-09以后)Google Search默认是用智能手机引擎来抓取,
# 所以如果js和css这样被disallow的话会有问题,建议还是把上面的disallow去掉。
# 参见: https :// mikolaje .github . io/2019/ hexo_seo . html
# Disallow: /js/
# Disallow: /fonts/
# Disallow: /css/
# Disallow: /live2dw/
# Disallow: /vendors/

Sitemap: https://blog.lianghy.ml/sitemap.xml
Sitemap: https://blog.lianghy.ml/baidu_sitemap.xml
更新safari标签页图标(favicon)
在_config.next.yml配置过favicon后, 重新hexo g && hexo s, safari可能不更新标签页图标(favicon), 但其他浏览器会立即更新. 这篇给出了方法让safari 更新favicon, 但我试了, 对其他网页有用, 对我的hexo(5.4.0)next(8.6.1)的博客没有用.
代码高亮
hexo>=5, 参考预览高亮方案, 选择喜欢的方案, 参照其上的代码, 去配置 _config.yml 和 _config.next.yml
若选的prism高亮方案, 不是next自带的, 需要安装prism-themes插件
npm install prism-themes参考文献和标题锚点
npm uninstall hexo-renderer-marked --save # 卸载默认渲染器
npm install hexo-renderer-markdown-it --save # 新渲染器, 支持参考文献引用和章节标题的锚点
hexo-renderer-markdown-it 支持把 footnote 渲染成文尾自动编号的参考文献, 还能为每个章节标题添加一个锚点, 点击一下锚点, 就能在浏览器的网址栏里跳转成此标题的url, 以便复制分享. 但是, 点击锚点并不能自动把锚点的url复制到剪切板. 详见
以下是我的配置
# Markdown-it config
# hexo默认的渲染插件 hexo-renderer-marked 的替代插件
## Docs: https://github.com/celsomiranda/hexo-renderer-markdown-it/wiki
markdown:
  # preset: 'default'
  # 渲染设置
  render:
    # 置为true时,html内容保持不变;置为false时,html内容将被转义成普通字符串
    html: true
    # 是否生成与XHTML完全兼容的标签(虽然我不懂是什么意思)
    xhtmlOut: false
    # 置为true时,每个换行符都被渲染成一个<br>(即Hexo的默认表现);置为false时,只有空行才会被渲染为<br>(GFM的默认表现)
    breaks: true
    # 是否自动识别链接并把它渲染成链接
    linkify: true
    # 是否自动识别印刷格式(意思是把(c)渲染为©这样的)
    typographer: true
    # 如果typographer被设置为true,则该选项用于设置将dumb quotes("")自动替换为smart quotes
    quotes: '“”‘’'
  # 设置所需插件
  plugins:
    - markdown-it-abbr
    - markdown-it-footnote
    - markdown-it-ins
    # - markdown-it-sub
    # - markdown-it-sup
    - markdown-it-mathjax
    # - hexo-math
  # 文中标题跳转的锚点设置
  anchors:
    # Minimum level for ID creation. (e.g. h2 to h6)
    level: 1
    # A suffix that is prepended to the number given if the ID is repeated.
    collisionSuffix: '_'
    # If `true`, creates an anchor tag with a permalink besides the heading.
    permalink: true
    # Class used for the permalink anchor tag.
    permalinkClass: header-anchor
    # Set to 'right' to add permalink after heading
    permalinkSide: 'left'
    # The symbol used to make the permalink 🔗  ¶ § ⦿ •
    permalinkSymbol: ''
    # Transform anchor to (1) lower case; (2) upper case
    case: 0
    # Replace space with a character
    separator: '-'
数学公式
next>=8 自带公式渲染器, 在 _config.next.yml 中如下配置, 无需安装任何公式渲染插件
# Math Formulas Render Support
# Warning: Please install / uninstall the relevant renderer according to the documentation.
# See: https://theme-next.js.org/docs/third-party-services/math-equations
# Server-side plugin: https://github.com/next-theme/hexo-filter-mathjax
math:
  # Default (false) will load mathjax / katex script on demand.
  # That is it only render those page which has `mathjax: true` in front-matter.
  # If you set it to true, it will load mathjax / katex srcipt EVERY PAGE.
  every_page: true

  mathjax:
    enable: true
    # Available values: none | ams | all, all 表示所有独行公式自动编号
    tags: all

  katex:
    enable: false
    # See: https://github.com/KaTeX/KaTeX/tree/master/contrib/copy-tex
    copy_tex: false
注意, 在_config.yml 中, hexo-renderer-markdown-it 的配置不能开上标和下标
# Markdown-it config
# hexo默认的渲染插件 hexo-renderer-marked 的替代插件
## Docs: https://github.com/celsomiranda/hexo-renderer-markdown-it/wiki
markdown:
  # 设置所需插件
  plugins:
    - markdown-it-abbr
    - markdown-it-footnote
    - markdown-it-ins
    # - markdown-it-sup # 不能开, 不然公式中若有 xxx^yyy^zzz, 会无法渲染成公式
    # - markdown-it-sub # 不能开, 不然公式中若有 xxx_yyy_zzz, 会无法渲染成公式
使用:
-
行内公式
$前后有空格也能渲染, 如$ f(x)=\left \|\dfrac{x^2}{y^2}\right \| $渲染成$ f(x)=\left |\dfrac{x^2}{y^2}\right | $ -
含有中文也能渲染, 如
$x_右$渲染成$x_右$ -
$\eqref{eq:sample}$能渲染成 “$\eqref{eq:sample}$". -
独行公式自动有编号
$$
\int_0^\infty \frac{x^3}{e^x-1} \text{d}x = \frac{\pi^4}{15} \label{eq:sample}
$$
渲染为
$$
\int_0^\infty \frac{x^3}{e^x-1} \text{d}x = \frac{\pi^4}{15} \label{eq:sample}
$$ -
独行公式取消编号需要加
\notag$$ \int_0^\infty \frac{x^3}{e^x-1} \text{d}x = \frac{\pi^4}{15} \notag $$渲染为
$$
\int_0^\infty \frac{x^3}{e^x-1} \text{d}x = \frac{\pi^4}{15} \notag
$$ -
我尝试过的第三方公式插件的问题
# 以下无法渲染:
npm install @traptitech/markdown-it-katex --save
# 以下和next自带的公式渲染器等效:
npm install markdown-it-katex --save
npm install markdown-it-mathjax --save
npm install markdown-it-mathjax-svg-next --save
npm install hexo-renderer-kramed --save
npm install hexo-renderer-pandoc --save # 渲染太慢
# 公式的处理器, 但不渲染, 已经集成到hexo里, 无需安装:
npm install hexo-math --save
自动生成文章链接
安装:
npm install hexo-abbrlink --save
npm install https://github.com/hyliang96/hexo-asset-image --save # 与hexo-abbrlink兼容,与hexo5兼容配置config.yml,推荐配置如下:
permalink: posts/:abbrlink/ # 或 posts/:abbrlink/ 或 :abbrlink.html 或 :abbrlink/ , 只要结尾是 :abbrlink.html 或 :abbrlink/, hyliang96/hexo-asset-image 皆支持
abbrlink:
abbrlink:
    alg: crc32   #算法: crc16(default) and crc32
    rep: hex     #进制: dec(default) and hex
生成的链接将会是这样的(官方样例):
crc16 & hex
https://post.zz173.com/posts/66c8.html

crc16 & dec
https://post.zz173.com/posts/65535.html

crc32 & hex
https://post.zz173.com/posts/8ddf18fb.html

crc32 & dec
https://post.zz173.com/posts/1690090958.html生成完后,原md文件的Front-matter 内会增加abbrlink 字段,值为生成的ID 。这个字段确保了在我们修改了Front-matter 内的博客标题title或创建日期date字段之后而不会改变链接地址。
浏览计数
整个网站的浏览人数和次数统计
计数busuanzi工具已经预置在next主题内, 无需另外安装, 只需在_config.next.yml中如下配置
# Show Views / Visitors of the website / page with busuanzi.
# For more information: http://ibruce.info/2015/04/04/busuanzi/
busuanzi_count:
  enable: true
  total_visitors: true
  total_visitors_icon: fa fa-user
  total_views: true
  total_views_icon: fa fa-eye
  post_views: false
post_views_icon: far fa-eye其中post_views填false, 即不使用busuanzi统计文章的浏览次数.
这是因为, busuanzi会有三个问题, 参考:
- 在首页中无法显示各篇文章的浏览次数
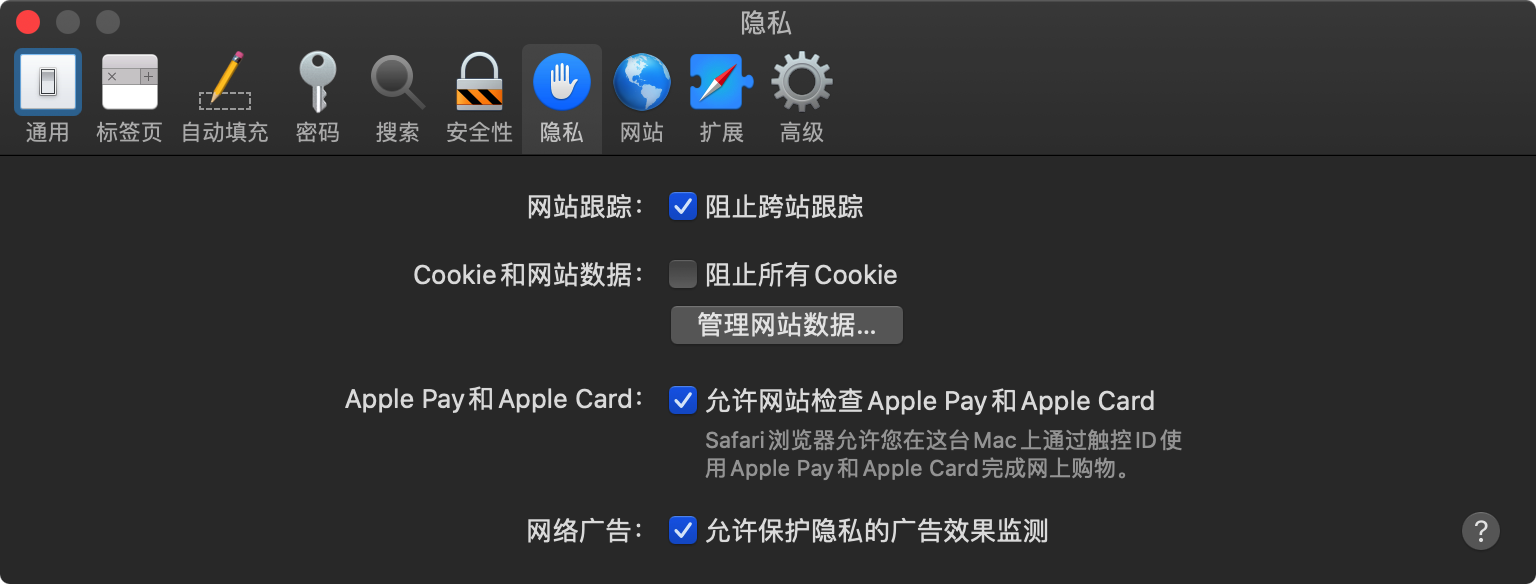
- 因为safari若开启“阻止跨站”,
busuanzi统计出的文章浏览次数直接与整个网站的浏览次数相同

- 因为safari若开启“阻止跨站”,
busuanzi统出的网站浏览人数(下图人头), 在每次刷新或站内切换网页后会加1, 这是按网站浏览次数(下图眼睛)的逻辑去更新了

每个文章的浏览次数统计
参考本文, 配置LeanClound 中的变量 Counter, 并如下在_config.next.yml填写app_id和app_key. 并设置security: false,以免安装hexo-leancloud-counter-security (安装很麻烦, 详见)
这个LeanClound账号和当中的应用实例, 可以和Vercel评论区所使用的共用, 因而app_id和app_key也与Vercel评论区的相同.
# Show number of visitors of each article.
# You can visit https://www.leancloud.cn to get AppID and AppKey.
leancloud_visitors:
  enable: true
  app_id: 5JGxxxxxxI
  app_key: Jv9xxxxxxEq7
  # Required for apps from CN region
  server_url: # <your server url>
  # Dependencies: https://github.com/theme-next/hexo-leancloud-counter-security
  # If you don't care about security in leancloud counter and just want to use it directly
  # (without hexo-leancloud-counter-security plugin), set `security` to `false`.
  security: false
记录文章访问量的唯一标识符是文章的发布日期和文章的标题,因此要确保这两个数值组合的唯一性,如果你更改了这两个数值,会造成文章阅读数值的清零重计。
相比于 busuanzi, 使用LeanCloud统计文章浏览次数, 有两个优点:
- 可首页中无法显示各篇文章的浏览次数
- 使用safari访问, 每篇文章单独计数, 不会所有文章浏览次数和整个网站的浏览次数相同
报错
gyp ERR! stack Error: gyp failed with exit code: 1
报错
gyp ERR! configure error
gyp ERR! stack Error: `gyp` failed with exit code: 1
解决方法
rm -rf node_modules
rm package-lock.json
npm update
npm install
ENOTEMPTY: directory not empty
若在hexo clean && hexo generate && hexo deploy时有如下报错,
======================= hexo deploy ========================
INFO  Validating config
INFO  ==================================
  ███╗   ██╗███████╗██╗  ██╗████████╗
  ████╗  ██║██╔════╝╚██╗██╔╝╚══██╔══╝
  ██╔██╗ ██║█████╗   ╚███╔╝    ██║
  ██║╚██╗██║██╔══╝   ██╔██╗    ██║
  ██║ ╚████║███████╗██╔╝ ██╗   ██║
  ╚═╝  ╚═══╝╚══════╝╚═╝  ╚═╝   ╚═╝
========================================
NexT version 8.8.2
Documentation: https://theme-next.js.org
========================================
INFO  Deploying: git
INFO  Clearing .deploy_git folder...
FATAL {
  err: [Error: ENOTEMPTY: directory not empty, rmdir '/Users/mac/Documents/blog/my-blog/.deploy_git/about'] {
    errno: -66,
    code: 'ENOTEMPTY',
    syscall: 'rmdir',
    path: '/Users/mac/Documents/blog/my-blog/.deploy_git/about'
}这说明,用hexo clean打扫不干净.deploy_git/about/,只有在这个文件夹是空的时才能完成hexo deploy。
则只需删除根目录下的.deploy_git/文件夹,
rm -rf .deploy_git然后重新执行hexo clean && hexo generate && hexo deploy即可重新生成.deploy_git/并完成deploy。