bash设置
配置环境变量
参见 http://elf8848.iteye.com/blog/1582137
适应Mac/Linux
一、改哪个文件
| 文件 | ubuntu或debian | mac | 启动条件 | 有效于 |
|---|---|---|---|---|
| /etc/profile | 无 | 有 | 用户登录系统 | 所有用户 |
| /etc[/bashrc|bash.bashrc] | 无 | 有 | 用户登录系统,开新 shell | 所有用户 |
| ~/[.bash_profile|.bash_login|.profile] | 有 | 有 | 用户登录系统 | 当前用户 |
| ~/.bashrc | 有 | 有 | 用户登录系统,开新 shell | 当前用户 |
| ~/.bash_logout | 有 | 有 | 用户退出系统时 | 当前用户 |
登录: 如 “su -“ 命令, ssh 连服务器
非登录: 执行’bash xxx’命令,戳开终端
启动上述文件,即下面的激活上述文件
执行顺序
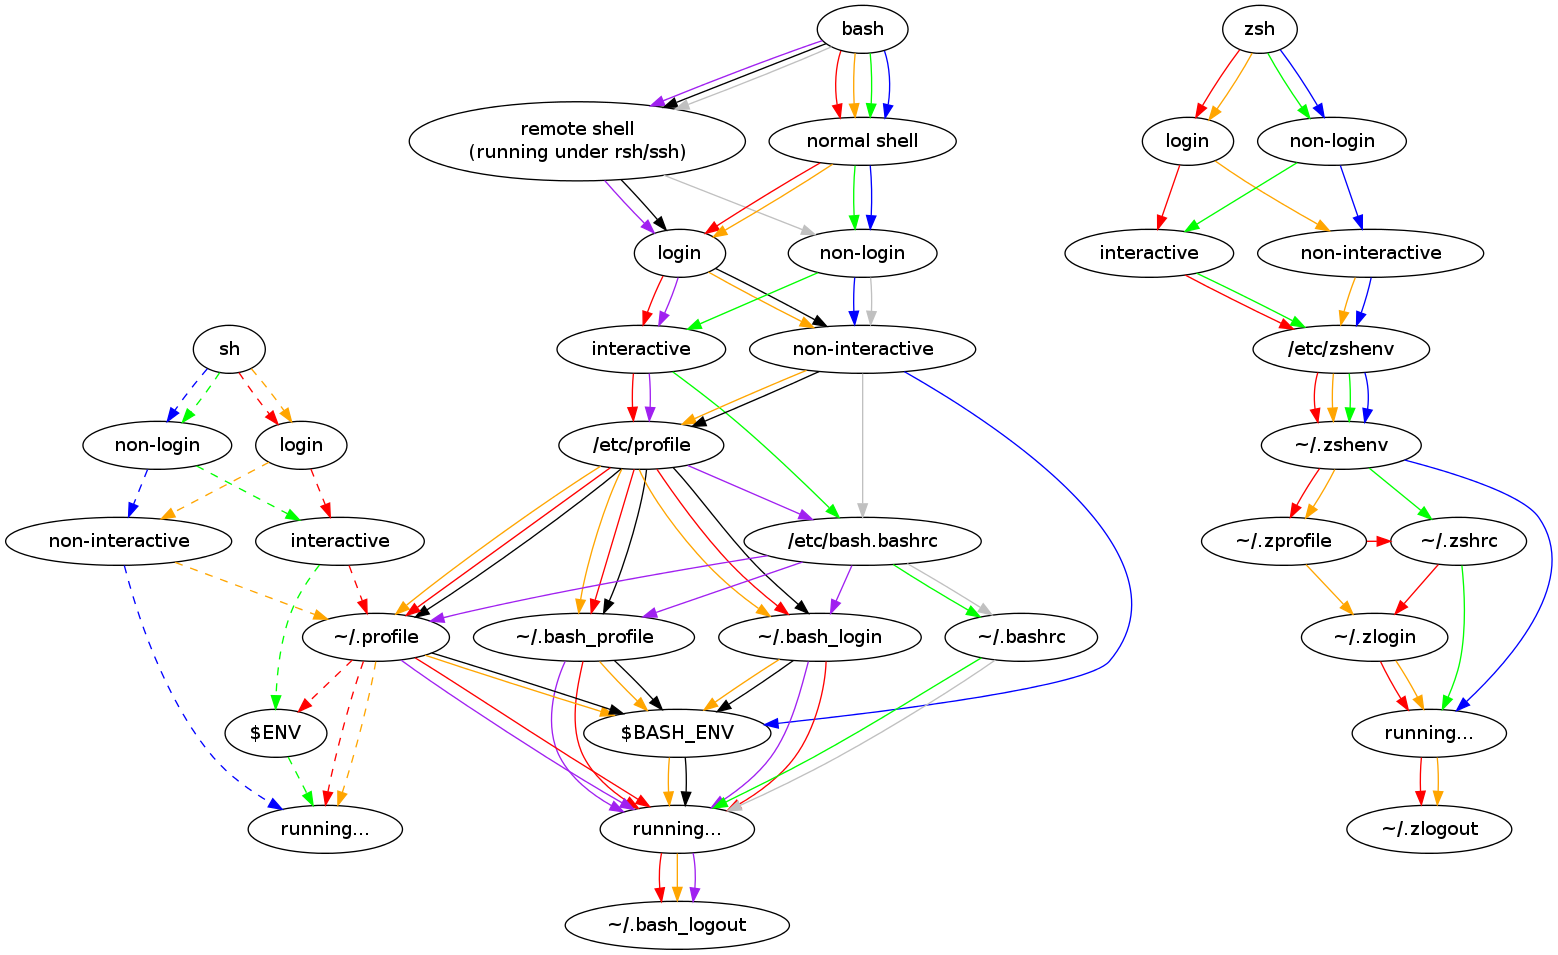
登录
流程图
                     /etc/profile.d/下诸文件
                          ↑ 手动
*用户登录* --先自动--> /etc/profile -手动-> /etc/(bash.)bashrc
    |                                    ↑ 手动
    |        不登录开新shell* ----->  ~/.bashrc  -手动->  ~/.bash_aliases
    \                               ↑ 手动
     \--- --后自动---------------> ~/[.bash_profile|.bash_login|.profile]从前到后找,只执行一个
     					     CentOS 默认用 ~/.bash_profile 文件
     					     Ubuntu 默认用 ~/.profile 文件
     					     混用也不影响
     					     sh 登录只加载 .profile, 与bash共用.profile
上述跳转关系依赖于
# /etc/profile,/etc/bashrc 中通常有
if [ -n "$BASH_VERSION" ]; then
    if [ -d /etc/profile.d ]; then
      for i in /etc/profile.d/*.sh; do
        if [ -r $i ]; then
          . $i
        fi
      done
      unset i
    fi
fi

# ~/.bash_profile 中通常有
if [ -n "$BASH_VERSION" ]; then
    if [ -f ~/.bashrc ] ; then
        . ~/.bashrc
    fi
fi

# ~/.bashrc 中通常有
if [ -n "$BASH_VERSION" ]; then
    if [ -f /etc/bashrc  ] ; then
        . /etc/bashrc
    fi
fi

# ~/.bashrc 中通常有
if [ -n "$BASH_VERSION" ]; then
    if [ -f ~/.bash_aliases  ] ; then
        . ~/.bash_aliases
    fi
fi

# ~/.bashrc 中通常有
if [ -n "$BASH_VERSION" ]; then
    if [ -f /etc/bashrc ]; then
        . /etc/bashrc
    fi
fi
分工建议
-
/etc/profile:所有用户系统信息,如置环境信息,只在用户登录时执行一次 -
~/.bash_profile: 本用户系统信息,如环境变量 -
~/.bashrc:shell 信息,如alias,配色
登出
~/.bash_logout
二、激活
修改完环境变量,要在终端输入
source 被改的文件命令别名
参见 http://www.cnblogs.com/fuly550871915/p/4961903.html
其语法是
alias 命令1='命令2'
# 或
alias 命令1="命令2"
# = 前后不能有空格
# 注释不能写在代码所在行尾
# '...'与"..."完全一样
# <命令1>不能有空格则在该用户登录电脑时,终端里输入命令1均会文本替换为命令2
~/.bashrc
Linux服务器的
以下可直接复制,用于配置Linux服务器用户、个人mac的 ~/.bashrc 文件
# enable color support of ls and also add handy aliases
if [ -x /usr/bin/dircolors ]; then
    test -r ~/.dircolors && eval "$(dircolors -b ~/.dircolors)" || eval "$(dircolors -b)"
    alias ls='ls --color=auto'
    alias dir='dir --color=auto'
    alias vdir='vdir --color=auto'
    alias grep='grep --color=auto'
    alias fgrep='fgrep --color=auto'
    alias egrep='egrep --color=auto'
fi

# ----- ls aliases -----
# 显(xxx)隐(.xxx) 文件(xxx)文件夹(xxx/) 用户名 大小(k/M/GB格式) 创建日期
alias ll='ls -alFh'
# 显(xxx)隐(.xxx) 文件与文件夹不区分(xxx)
alias la='ls -A'
# 显 文件(xxx)文件夹(xxx/) hide .pyc
alias l='ls -CF -I*.pyc'
mac的
# ==================== 命令行配色 =====================
# -------------------- alias to ls ------------------
# 显(xxx)隐(.xxx) 文件(xxx)文件夹(xxx/) 用户名 大小(k/M/GB格式) 创建日期
alias ll='ls -alFh'
# 显(xxx)隐(.xxx) 文件与文件夹不区分(xxx)
alias la='ls -A'
# 显 文件(xxx)文件夹(xxx/) hide .pyc
alias l='ls -CF -I*.pyc'

# -------------------- alias to grep ------------------
# 上色
alias ls='ls --color=auto'
alias dir='dir --color=auto'
alias vdir='vdir --color=auto'
alias grep='grep --color=auto'
alias fgrep='fgrep --color=auto'
alias egrep='egrep --color=auto'

# ------------- 命令行使用Coreutils 配色方案 ----------
# Coreutils安装教程:http://linfan.info/blog/2012/02/27/colorful-terminal-in-mac/
# 效果:不同类型的文件有不同颜色,如图水红色,文件夹群青色...
# 采用GNU Coreutils的gdircolor配色替代ls的配色
# 修改~/.dir_colors(自定义配色文件),以修改ls命令使用的环境变量LS_COLORS(BSD是LSCOLORS)
if brew list | grep coreutils > /dev/null ; then
  PATH="$(brew --prefix coreutils)/libexec/gnubin:$PATH"
  alias ls='ls -F --show-control-chars --color=auto'
  eval `gdircolors -b $HOME/.dir_colors`
fi
Mac的命令行配色
Coreutils 配色方案
效果:不同类型的文件有不同颜色,如,图片水红色,文件夹群青色…
原理:采用GNU Coreutils的gdircolor配色替代ls的配色,修改~/.dir_colors(自定义配色文件),以修改ls命令使用的环境变量LS_COLORS(BSD是LSCOLORS)
-
安装Coreutils
- mac: 通过Homebrew安装Coreutils
brew install xz coreutils-
Linux:
-
若有sudo权限,依安装教程,即
sudo apt-get update sudo apt-get install coreutils -
若无sudo权限,使用conda安装coreutils
conda install -c bioconda coreutils
-
-
生成颜色定义文件
gdircolors --print-database > ~/.dir_colors # 如显示没有“gdircolors”命令,但有”dircolors“,则执行下列命令 dircolors --print-database > ~/.dir_colors -
在
~/.bash_profile配置文件中加入以下代码# ------------- 命令行使用Coreutils 配色方案 ---------- # Coreutils安装教程:http://linfan.info/blog/2012/02/27/colorful-terminal-in-mac/ # 效果:不同类型的文件有不同颜色,如图水红色,文件夹群青色... # 采用GNU Coreutils的gdircolor配色替代ls的配色 # 修改~/.dir_colors(自定义配色文件),以修改ls命令使用的环境变量LS_COLORS(BSD是LSCOLORS) if brew list | grep coreutils > /dev/null ; then PATH="$(brew --prefix coreutils)/libexec/gnubin:$PATH" alias ls='ls -F --show-control-chars --color=auto' eval `gdircolors -b $HOME/.dir_colors` fi
~/.bash_profile
以下可直接复制,用于配置Linux服务器用户、个人mac的 ~/.bash_profile 文件
source ~/.bashrc
# ---------------- alias to resource ----------------
alias gpu='nvidia-smi' # 查GPU使用
alias mem='free'  # 查内存使用
alias killpid='kill -9'  # killpid [pid] 杀死指定编号的进程

# ----------------- use which gpu -------------------
# 用法
# `gpuid 0 python xxx.py` 现在暂时用GPU0运行 xxx.py
# `gpuid 0` 并不能使得接下来一直默认用GPU0运行各个程序
gpuid()
{
    eval "CUDA_VISIBLE_DEVICES=$*"
}
# 若`nvidia-smi`显示的GPU编号和`CUDA_VISIBLE_DEVICES=[GPU编号]`不一致,则
# {
#     arg1="$1"
#     shift
#     if [ "$arg1" == "1" ]
#     then
#         eval "CUDA_VISIBLE_DEVICES=0 $*"
#     elif [ "$arg1" == "0" ]
#     then
#         eval "CUDA_VISIBLE_DEVICES=1 $*"
#     else
#         echo "no gpuid = $arg1, command 'nvidia-smi' to see more"
#     fi
# }

# ---------------- alias envr vari ------------------
alias vbp='vim ~/.bash_profile'
alias sbp='source ~/.bash_profile'
alias vbr='vim ~/.bashrc'
alias sbr='source ~/.bashrc'

# ---------------- alias to python ------------------
alias py='python'
alias ip='ipython'
alias nt='jupyter notebook'

# -----------------  alias to tmux ------------------
# create a new tmux session, tmux new
alias tn='tmux new -s'
# list all session of tmux session
alias tl='tmux ls'
# kill a tmux session
alias tk='tmux kill-session -t'
# kill tmux server, means tmux kill all
alias tka='tmux kill-server'
# attach to a tmux session, t means go to
alias ta='tmux a -t'
# attach to the last tmux session, r means recover
alias tr='tmux a'

# ------------------ 命令行基础操作 ---------------
alias md='mkdir'
alias lk='ln -s'
# 创建软连接
alias ..='cd ../'